 by
by A room is the friendliest thing to draw in perspective because it is a box seen from inside: every wall is a plane you already know how to construct, and every piece of furniture is a smaller box on its floor. There are two methods below, and they are not equal. One-point, built from the back wall, is what every classroom teaches and it is genuinely the easier one to learn. Two-point, built from a corner, is what almost every real interior you admire actually uses. Learn the first, then spend your time on the second. The 1-point grid and the 2-point grid on this site draw the floor and ceiling in metre squares, which turns most of the measuring into counting.
Room in perspective is an interior drawn so that the floor, ceiling and walls converge correctly toward vanishing points on the horizon. In one-point perspective the viewer faces one wall squarely and there is a single vanishing point; in two-point the viewer faces a corner and each pair of walls has its own vanishing point on the horizon. The horizon is at the viewer's eye height in both.
First decision: one point or two?
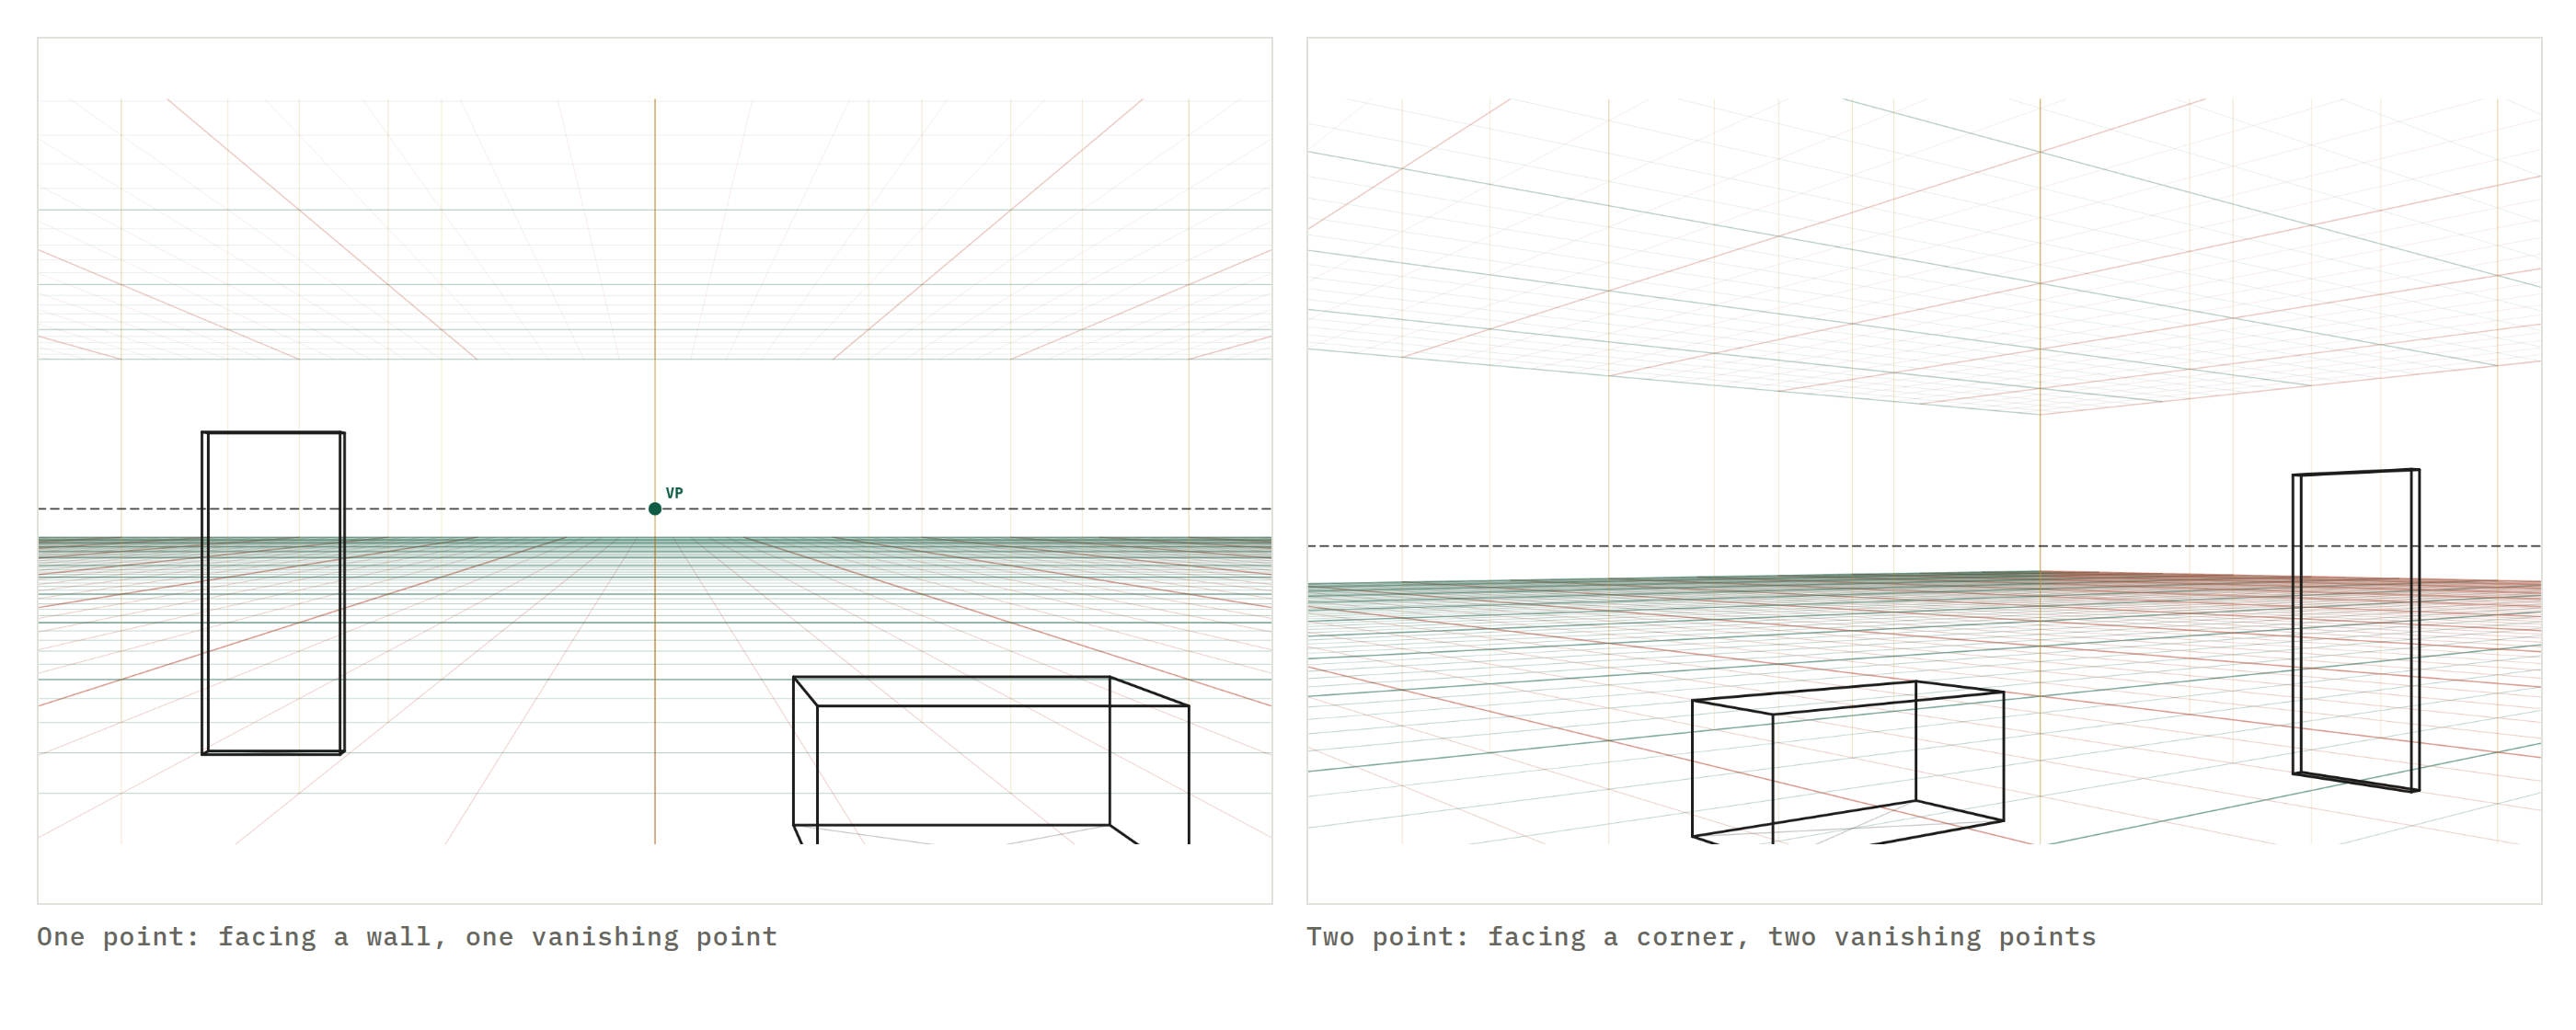
Stand in the room and decide what you are looking at. If you face a wall squarely, so the floor edges run straight away from you, it is a one-point room: the back wall is a flat rectangle, and everything else recedes to a single vanishing point on it. If you face a corner, so both walls run away from you at angles, it is two-point: there is no flat wall, and each set of parallel edges has its own vanishing point out to the left and right.
One-point is easier and more formal: a corridor, a stage, a symmetrical hall, a view through a doorway. Two-point is what most rooms look like from where people stand: the corner of a kitchen, a living room from the door. If you are unsure, the general test in 1-point vs 2-point vs 3-point applies indoors too. Three-point comes in only when the viewer looks up at a high ceiling or down from a mezzanine; skip it for a first room.
If you would rather have the construction done for you, the room perspective generator draws the floor, a ceiling at a real height and furniture boxes in metres from one camera, straight on or from a corner, and exports the result as a layer.
Eye level indoors
Outdoors the horizon is often visible; indoors it never is, and it is still there. Put it at the viewer's eye height. A standing adult: about 1.6 m. Seated in a chair: about 1.2 m. On the floor, or a child: 0.6 m. A camera on a tripod: wherever the tripod is.
Then relate that to the room's height. A 2.4 m ceiling with a 1.6 m horizon puts the horizon two-thirds of the way up every wall: you see more floor than ceiling. A 1.2 m horizon puts it at mid-height, and floor and ceiling show equally. Get this fraction right at the start, because it fixes how much floor there is to put furniture on, and it is the single strongest cue for how tall the viewer is. Interiors drawn with the horizon at mid-height look, correctly, like someone sitting down; if that was not intended, raise it. The horizon and eye level calculator converts an eye height and a lens into a position in the frame.
Method 1: a one-point room (the back-wall method)
Step 1 — the back wall. Draw a rectangle for the far wall, in the room's proportions (a 4 m wide, 2.4 m high wall is a rectangle five units by three). Its size in the picture sets the lens: a small rectangle in a large picture means a wide lens and a deep view; a rectangle that nearly fills the picture means a long lens or a shallow room. For a normal view, make it about half the picture width.
Step 2 — horizon and vanishing point. Draw the horizon across the back wall at the viewer's eye height, using the wall's height as the scale: two-thirds up for a standing viewer in a 2.4 m room. Put the vanishing point on the horizon. Centred, the view is symmetrical; off-centre, you are standing nearer one wall, and that is usually the more natural picture. Keep it inside the back wall.
Step 3 — the room's edges. From the vanishing point, draw lines outward through each of the back wall's four corners and extend them to the picture's edge. These are the four edges of the room: where floor meets side walls (the bottom two) and where ceiling meets side walls (the top two). The room is now drawn.
Step 4 — the floor grid. Divide the bottom edge of the back wall into metres and draw lines from each mark to the vanishing point: those are the floor boards running away from you. For the cross lines (the ones parallel to the back wall), use the diagonal: draw a line from a back-wall floor corner through the opposite corner of the nearest floor square and on to the picture's edge, and every place it crosses a receding line is where a cross line goes. The 1-point grid does this for you and prints it; on paper it takes a minute.
Step 5 — the walls' grids. The same marks that divide the floor divide the walls: a vertical line up from each floor-grid crossing on the wall edge gives the wall's metre lines. Doors and windows are placed on these.
Method 2: a two-point room (the corner method)
Step 1 — horizon and vanishing points. Draw the horizon at eye height. Put the two vanishing points on it, well outside the picture on each side for a normal lens. If they end up inside the picture the room will look like a fisheye view; the vanishing point distance calculator gives the spacing for a given lens and viewing angle. With a 50 mm lens and the walls turned 40° and 50° to the view, they sit about 1.2 and 1.7 picture widths from the centre, nearly three picture widths apart.
Step 2 — the corner. Draw the vertical line where the two walls meet, from floor to ceiling. This is your scale: its length is the room's height (2.4 m, say), and every other height in the room is measured against it.
Step 3 — the walls. From the top and bottom of the corner line, draw lines to each vanishing point. The two lines to the left point are the top and bottom of the left wall; the two to the right, of the right wall. Where the walls end (at the room's corners, or the picture's edge), draw verticals.
Step 4 — the floor grid. On the corner line, the floor is at the bottom. Measure a metre along the bottom of each wall in perspective: the quick way is to mark true metres on a horizontal line through the corner's floor point, then transfer them to the receding floor line with lines from a measuring point (or just estimate the first square and use the diagonal method for the rest). Lines from each mark to the opposite vanishing point cross to make the floor grid. On the 2-point grid the floor squares and the ceiling grid are already drawn at the lens and angle you set, and you can put the room's corner on any grid crossing.
Step 5 — the ceiling. Same as the floor, at the top of the corner line: lines to each vanishing point, crossed by lines from the marks. Ceilings matter more in two-point than in one-point because both are visible from a standing view; turn the ceiling grid on to see how the two converge together.
Doors, windows and openings
An opening in a wall is a rectangle on that wall, and a rectangle on a receding wall has two horizontal edges that go to the wall's vanishing point and two vertical edges that stay vertical. So:
Find its position along the wall from the floor grid (a door 1 m from the corner starts at the first grid line). Draw the two verticals for its jambs. Set the top with a reference height: a standard door is 2.1 m, so in a 2.4 m room its top is at seven-eighths of the wall's height at that depth, which you read off the corner line and carry to the door's position with a line to the vanishing point. Windows the same, with a sill line as well as a head line: sill at 0.9 m, head at 2.1 m, for a typical window.
Show thickness. A wall is 0.1–0.3 m thick, and an open door or a window reveals it as a narrow face at the jamb receding to the other vanishing point (or, in one-point, as a short horizontal). It is the detail that makes a drawn room feel built rather than papered.
Furniture to scale
Every piece of furniture is a box on the floor grid, and the grid makes it a counting exercise. A dining table is 1.6 × 0.8 m and 0.75 m high: mark a rectangle of that many squares on the floor where it stands, raise verticals from the four corners, and take the height from the corner line (or a reference figure) at the same depth. A chair seat is 0.45 m high, its back 0.9 m; a worktop 0.9 m; a sofa 0.9 m deep and 0.8 m high at the back; a bed 0.5 m high. Draw the box first, then round the furniture inside it.
Two things keep furniture from looking wrong. Its edges must go to the room's vanishing points if it sits square to the walls; a table at an angle to the walls has its own pair of vanishing points on the same horizon, which the perspective box generator shows when you rotate a box. And its feet must sit on the floor grid at its depth; a chair drawn from memory almost always floats.
People in the room follow the figures in perspective lesson: standing figures the viewer's height have their eyes on the horizon; a seated viewer sees standing people's heads above it.
Where room drawings go wrong
Vanishing point outside the back wall (one-point). The viewer would be standing outside the room. Keep it within the back wall's rectangle.
Horizon at mid-height by default. Reads as a seated viewer. For a standing view, two-thirds of the wall height.
Vanishing points inside the picture (two-point). Fisheye distortion; everything near the edges splays. Move them out.
Furniture at a different scale from the room. A sofa drawn to look right in the picture rather than measured on the floor grid. Count squares.
Floor and ceiling converging at different rates. They share the vanishing points; a ceiling line that misses the point the floor lines use is the most common error in two-point rooms. Check every long line against the point.
Openings with tilted verticals. Door jambs and window edges are vertical in one- and two-point. If they lean, you have drawn a three-point view by accident.
Try it
Draw the same 4 × 5 m room three times: one-point from the doorway, standing; one-point seated; two-point from the corner, standing. Put in a door, a window and a table each time. Print the 1-point and 2-point printable grids if you would rather have the floor squares on paper from the start, and use the perspective drawing tools guide if you are working with a ruler and T-square.
Keep going
1-point perspective grid · 2-point perspective grid · how to draw figures in perspective · how to draw perspective · 1-point vs 2-point vs 3-point · room perspective generator
Questions
How do you draw a room in one-point perspective?
Draw the back wall as a rectangle, put the horizon across it at eye height and one vanishing point on the horizon. Draw lines from the vanishing point through the four corners of the back wall outward: those are the edges where floor, ceiling and side walls meet. Everything parallel to the side walls goes to the vanishing point; everything parallel to the back wall stays horizontal or vertical.
Where should the horizon be in a room drawing?
At the viewer's eye height: about 1.6 m standing, 1.2 m seated, 0.6 m for a small child or a low camera. In a 2.4 m room a standing viewer's horizon is two-thirds of the way up the back wall. A horizon at mid-height reads as seated; one near the ceiling reads as a tall person or a camera on a shelf.
When should I use two-point perspective for an interior?
When the viewer looks into a corner rather than at a wall. Two-point shows two walls receding in different directions and is the more natural view for most rooms; one-point is for a view straight down a corridor or at a wall, and for stage-like compositions.
How do I get the furniture the right size?
Use a measured grid. Mark metre squares on the floor (the grid tools here draw them), then build each piece as a box the right number of squares wide and deep, and take its height from a reference vertical at the same depth: a door at 2.1 m, a table at 0.75 m, a chair seat at 0.45 m, a worktop at 0.9 m.
Why does my room look too deep or too wide?
The vanishing point is too close to the back wall's edge or the lens is too wide. In one-point, a back wall that is a small rectangle in a large picture means a wide lens and a very deep room; make the back wall bigger for a normal view. In two-point, vanishing points inside the picture mean a very wide lens; move them out.
How do I draw a window on a side wall?
Place its top and bottom edges as lines to the vanishing point (they are parallel to the wall's floor and ceiling edges). Set its height on the wall with a reference vertical, then find its width by marking the near and far jamb positions on the floor grid and drawing verticals up from them.
How do I draw the corner of a room?
The corner is a single vertical line, and everything else hangs off it. Draw that vertical first, decide where the horizon crosses it (that is your eye level), then run the wall-floor join from the bottom of the line to a vanishing point on each side and the wall-ceiling join from the top to the same two points. The result is the two walls, the floor and the ceiling in one construction.
A new lesson and a new grid, about once a month.
Each lesson arrives by email before it goes on the site, with the grid it was drawn on and the link to open it. Subscribers also get both free starter packs and the subscriber price on the paid ones. Never more than two emails a month; one click to leave.
Handled by Kit on our behalf. Your address is used for this letter and nothing else — see the privacy page.