 by
by The Illustrator perspective grid tool has been in Illustrator since CS5 in 2010, barely changed since, and is powerful and famously easy to summon by accident. Be honest about which half you need. If the grid appeared while you were doing something else, skip to the next section and switch it off. If you actually want to draw on it, know what you are agreeing to first: the grid permanently reshapes anything you attach to it, it cannot describe a real lens, and it is a poor fit for casual illustration. Committed technical work is where it earns its keep. Adobe's reference is the Perspective Grid page in the Illustrator user guide; what follows is the practical version, including the settings that matter and the two things the tool cannot do.
Illustrator's Perspective Grid is a built-in construction aid with one, two or three vanishing points and three drawing planes (left, right and ground). While a plane is active, shapes, text and symbols you draw or drag onto the artboard are transformed to sit on that plane, so a rectangle becomes a wall and a row of circles becomes a row of receding windows. It is a drawing guide, not a camera: it has no lens setting and the grid itself is not artwork.
How to turn off the perspective grid in Illustrator
Press Shift + Ctrl + I (Windows) or Shift + Cmd + I (Mac). That toggles the grid. The menu route is View → Perspective Grid → Hide Grid.
The grid appears because Shift + P selects the Perspective Grid tool, and the tool shows the grid whenever it is active. Switching to the Selection tool does not hide it; only the toggle above does. If it happens often, open Edit → Keyboard Shortcuts, find Perspective Grid Tool under Tools, and remove or change the shortcut. Nothing in your document depends on the grid being visible.
If the grid comes back every time you open the file, a grid was defined and left showing when the document was saved. Hide it, save, and it stays hidden. To remove a custom grid preset entirely, go to View → Perspective Grid → Define Grid and delete the preset.
Where the perspective grid tool is in Illustrator
The Perspective Grid tool sits in the toolbar with the Perspective Selection tool nested under it (long-press the icon). In the Basic toolbar it may be hidden; open Window → Toolbars → Advanced, or drag it in from the Edit Toolbar drawer at the bottom of the toolbar. The grid presets and settings live under View → Perspective Grid, not under the tool.
Setting up a grid
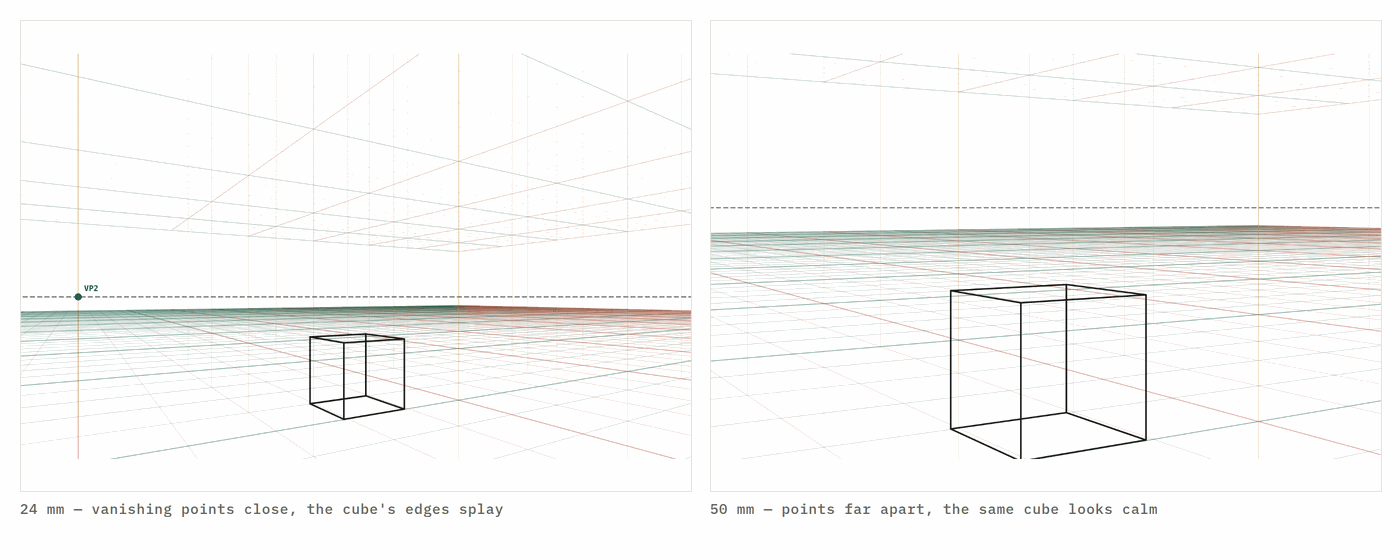
View → Perspective Grid offers One Point, Two Point and Three Point presets, each with a normal view and a wide-angle view. Choose the number of points by how the scene is seen: straight on for one point (a room from the doorway), from a corner for two points (a building, a box), and looking up or down for three. If you are unsure, read 1-point vs 2-point vs 3-point perspective.
Once a preset is active, a widget appears on the artboard with handles you can drag:
Horizon height — the small diamond on the vertical centre line. Drag it up for a high viewpoint (looking down on things), down for a low one. It is the eye level of the picture; everything at the viewer's eye height sits on this line.
Vanishing points — the diamonds on the horizon at the left and right edges. Drag them apart for a calm, long-lens view; drag them together for a dramatic, wide-lens one. Points that are too close together are the most common reason a grid drawing looks distorted; for two-point, keep them at least one artboard-width apart unless you want a fisheye feel. The vanishing point distance calculator gives the spacing for a given rotation and lens.
Ground level — the handle at the bottom; drag it to move the whole grid up or down without changing the horizon.
Moving and "rotating" the grid — there is no rotate handle. To shift the grid as a whole, drag the ground-level handle; to change the angle the scene is seen from, move the vanishing points (further off-centre for a sharper turn, closer together for a wider lens) or start from another preset. If you need the grid at an exact rotation and lens, Define Grid takes the numbers, and the 2-point grid here will tell you what they should be.
Grid cell size and extent — the handles at the ends of the grid; the cell size sets the spacing of the grid lines and is worth matching to a real unit (one cell = one metre, say) so that objects stay in proportion.
For exact numbers, View → Perspective Grid → Define Grid opens a dialog with the type, units, scale, gridline spacing, viewing angle, viewing distance, horizon height and the position of each vanishing point. Save the result as a preset and it appears in the Perspective Grid menu for every document.
Drawing on the grid
The plane switching widget in the top-left of the artboard selects which plane you are drawing on: the left face, the right face, or the horizontal ground. Click a face, or press 1 (left), 2 (horizontal), 3 (right); 4 turns plane snapping off so you can draw normally without hiding the grid.
With a plane active, the rectangle, ellipse, polygon and line tools draw in perspective on that plane: a rectangle is a wall panel, an ellipse is a manhole cover. Drawing order matters as it does on paper: start with the largest box, then subdivide.
To put existing artwork onto the grid, use the Perspective Selection tool (Shift + V): drag the object while the plane you want is active and it is transformed to match. Hold Alt/Option while dragging to duplicate, and use the arrow keys to move an object perpendicular to its plane (a window that needs to sit deeper in the wall, for example). Press 5 while dragging to move an object along the plane's depth instead of across it.
Text and symbols can be placed with the Perspective Selection tool as well, and stay editable: double-click a text object to edit it in isolation mode, and the edited text keeps its perspective. This is the fastest way to put a sign on a building or a label on a package.
To take an object off the grid, select it with the Perspective Selection tool and choose Object → Perspective → Release with Perspective. It keeps its distorted shape but is no longer attached to the plane.
Common problems
Everything I draw is distorted. Plane snapping is on and a plane is active. Press 4 to switch it off, or hide the grid.
The object snaps to the wrong plane. The active plane is the one highlighted in the widget, not the one nearest the cursor. Press 1, 2 or 3 first, then drag.
The drawing looks stretched at the edges. The vanishing points are too close together, which is the same as using a very wide lens. Drag them further apart; anything near the edge of a wide-angle grid will splay.
Fills and strokes look wrong after moving to the grid. Illustrator transforms the shape but not the stroke weight: a 2 pt stroke stays 2 pt everywhere, which reads oddly in deep perspective. Reduce stroke weights on far objects by hand or use Object → Expand before placing.
I can't select the grid handles. The Perspective Grid tool (Shift + P) must be active to see and drag the widget handles; the Perspective Selection tool only moves artwork.
What Illustrator's grid cannot do
It is a construction aid rather than a camera model. It does not report a lens, does not export the grid as a separate image, and its three-point preset is built from fixed positions rather than a rotatable view. For a shot-planning grid with a lens readout, set up the 3-point grid here (or the 2-point grid for a level view), export it as SVG, and File → Place it into Illustrator on a locked template layer. The lines are real vector paths you can snap to, and the lens, rotation and tilt are known numbers you can write on the layer.
If the drawing must sit inside a photograph, run the photo through the vanishing point finder first; it reads the horizon, vanishing points and lens, and you can either type those into Define Grid or open the matching grid here and place it.
Elsewhere on this site
Photoshop's perspective tools (warp, crop, vanishing point) · Photoshop perspective grid · Affinity Designer and Photo · the perspective tools guide
Questions
How do I turn off the perspective grid in Illustrator?
Press Shift + Ctrl + I on Windows or Shift + Cmd + I on Mac, or go to View → Perspective Grid → Hide Grid. Selecting any tool other than the Perspective Grid tool does not hide it.
Why does the perspective grid keep appearing?
Pressing Shift + P selects the Perspective Grid tool and shows the grid. It is easy to hit by accident. Hide it with Shift + Ctrl/Cmd + I, and consider reassigning the shortcut in Edit → Keyboard Shortcuts.
Where is the perspective grid tool in Illustrator?
In the toolbar, grouped with the Perspective Selection tool (long-press the icon). In the Basic toolbar it may be hidden: switch to Window → Toolbars → Advanced, or drag it in from the Edit Toolbar drawer at the bottom of the toolbar. The grid presets are under View → Perspective Grid.
Can Illustrator make a 3-point perspective grid?
Yes. View → Perspective Grid → Three Point Perspective, then choose a preset, or define your own with View → Perspective Grid → Define Grid. The third vanishing point is dragged with its own diamond handle.
How do I put existing artwork onto the perspective grid?
Select the plane in the plane switching widget (or press 1, 2 or 3), then drag the object with the Perspective Selection tool (Shift + V). It is transformed onto that plane. Hold Alt/Option while dragging to leave a copy behind.
How do I move or rotate the perspective grid in Illustrator?
Move it with the Perspective Grid tool (Shift + P) active: drag the ground-level handle to shift the whole grid, the horizon diamond to change eye level, and the vanishing-point diamonds to change the angle of the two planes. There is no rotate handle; a grid seen from a different angle is made by moving the vanishing points (closer together and off-centre for a sharper turn) or by choosing a different preset in View → Perspective Grid, and the artwork itself rotates with the Perspective Selection tool (Shift + V) plane by plane.
What are the perspective grid shortcuts in Illustrator?
Shift + P selects the Perspective Grid tool, Shift + V the Perspective Selection tool, Shift + Ctrl/Cmd + I shows or hides the grid. With the Perspective Selection tool active, 1, 2 and 3 pick the left, horizontal and right planes and 4 turns plane snapping off; the plane-switching widget in the top-left corner does the same with the mouse.
Can I get a perspective grid that matches a real lens in Illustrator?
Not with the built-in tool, which has no lens setting. Generate a grid at the lens and rotation you want with the free grid tools here, download it as SVG, and File → Place it on a locked layer; the lines are real paths you can snap to.
A new lesson and a new grid, about once a month.
Each lesson arrives by email before it goes on the site, with the grid it was drawn on and the link to open it. Subscribers also get both free starter packs and the subscriber price on the paid ones. Never more than two emails a month; one click to leave.
Handled by Kit on our behalf. Your address is used for this letter and nothing else — see the privacy page.