 by
by The Clip Studio perspective ruler is the best built-in perspective tool of any drawing app: a ruler that your strokes snap to. One thing to settle before you spend anything: every perspective feature below is in PRO, the one-time licence at $63 (September 2026). EX costs $277 and adds multi-page comic management, none of which touches perspective. Do not buy EX for the rulers. Celsys documents every option in the Clip Studio Paint manual; this is the working version.
Perspective ruler is Clip Studio Paint's special ruler with an eye level and one, two or three vanishing points. When Snap to Special Ruler is on, every stroke you draw is pulled straight toward whichever vanishing point matches its direction, so freehand lines become ruled perspective lines. It lives on a layer (or on all layers), can be edited with the Object tool at any time, and can be saved with the file.
Creating the perspective ruler in Clip Studio
Route 1 — from the menu. Layer → Ruler/Frame → Create Perspective Ruler. Choose 1-point, 2-point or 3-point and tick Create new layer if you want the ruler on its own layer, which is the tidy option: you can hide, lock and reuse it. Click OK and the ruler appears with an eye-level line and vanishing-point handles at a default position.
Route 2 — from a reference. Select the Perspective Ruler sub tool (under Ruler in the tool palette, or press U and pick it). Draw one line along an edge in your reference image, then a second along an edge that is parallel to it in real life; Clip Studio places the vanishing point where the two lines meet and draws the eye level through it. Two more lines along edges of the other direction set the second point. This is the way to match a photograph, and it is the same construction the vanishing point finder does automatically.
Pick the number of points by the scene, not by habit: one point for a room or road seen straight on, two for a building corner or a box, three when the camera looks up or down. 1-point vs 2-point vs 3-point has the test.
Moving it
Switch to the Object tool (O) and click the ruler. Handles appear:
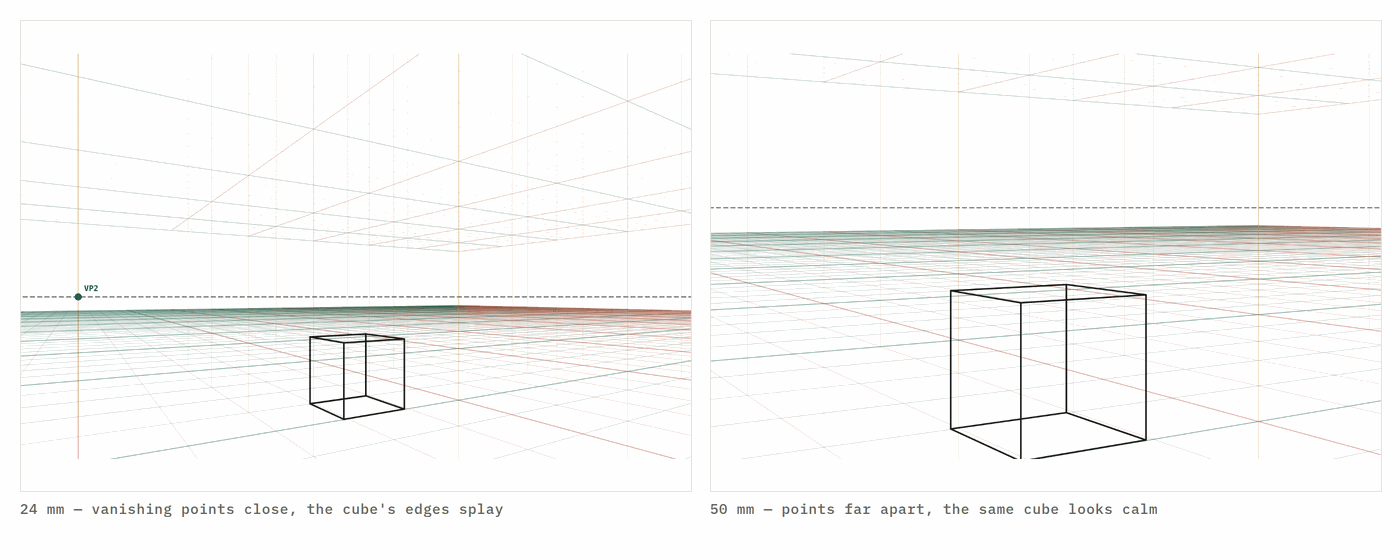
- Vanishing point diamonds — drag one along the eye level to move it. Drag a point far out for a calm, long-lens view; bring the two points together for a wide-angle, dramatic one. Points inside the canvas on both sides give a fisheye feel.
- Eye-level line — drag it up or down to change the horizon: high for looking down on a scene, low for a ground-level view. Hold Shift while dragging a vanishing point to keep the eye level horizontal.
- Guide lines — the lines fanning out from each point can be dragged to rotate them; they are only visual guides and do not change snapping.
- The small square handle on the eye level moves the whole ruler at once; the circular handle on it toggles snapping for that ruler, and the small cross toggles each vanishing point's snapping on and off.
In the Tool Property palette for the Object tool you can also turn the eye level, the grid and individual vanishing points on or off, and set the ruler to Show on all layers so every layer snaps to the same perspective.
Snapping
Turn on Snap to Special Ruler (the icon in the command bar, Ctrl/Cmd + 2 by default). Strokes now snap to whichever vanishing point is closest to the direction you start drawing; start a stroke roughly along a wall's edge and it locks to that wall's vanishing point. Vertical strokes snap to vertical on a 1- or 2-point ruler, and to the third point on a 3-point ruler.
Tap the small cross handle on a vanishing point to disable snapping to that point when it is getting in the way, and the circle on the eye level to switch the whole ruler off temporarily without hiding it. Snapping works on raster and vector layers, with any brush; for clean line art use a vector layer so the snapped lines can be corrected afterwards.
Grid and settings worth knowing
With the ruler selected, the Tool Property palette has a Grid option that draws guide lines across the ground, left and right planes at an adjustable spacing. It is useful as a visual aid but it is not a measured grid: the spacing is in screen units, not metres, so it cannot tell you how tall a figure should be at a given depth.
Fisheye. Create Perspective Ruler in Clip Studio Paint 2.0 and later has a fisheye option that curves the guides up to 180°; strokes snap to the curves. For anything wider, or for 6-point views, use the curvilinear grid and import it as a layer.
Saving and reusing. The ruler is saved with the .clip file. To reuse a favourite setup, keep a template file with the ruler on its own layer, or register the ruler layer as a material (drag it into the Material palette).
Importing a Clip Studio Paint perspective grid that matches a real lens
The ruler does not know what lens it represents, and it has no measured ground squares, so for a shot that needs to look like a 24 mm or an 85 mm, or for a scene where figures must be the right size at different depths, set the grid up here first.
- Open the 2-point grid (or the 3-point grid for a tilted view). Drag to set the rotation, choose the lens, set the horizon.
- Download a transparent PNG at 2×, or on iPad tap Copy to clipboard.
- In Clip Studio: File → Import → Image (or Edit → Paste). Lower the layer opacity to 30–40% and lock it.
- Select the Perspective Ruler sub tool and draw along two red lines, then two green lines from the imported grid. The ruler now has the same vanishing points and eye level as the lens-accurate grid.
- Draw on a new layer with Snap to Special Ruler on. The imported grid gives you the metre squares and the reference cube for sizing; the ruler gives you snapping. Hide the grid layer for the final image.
Because the grid is computed from a camera model, this is also how to match a photographed background: read its lens and tilt with the vanishing point finder, open the grid at the same numbers, and the ruler you trace from it will agree with the photo.
If it isn't behaving
Strokes snap to the wrong point. The stroke started too close to the other point's direction. Start the stroke more clearly along the edge you mean, or disable the other point's snapping with its cross handle while you work on one wall.
The ruler disappeared. It is on a different layer. Select that layer, or set the ruler to Show on all layers from the layer's ruler icon menu.
Vertical lines lean. You are using a 3-point ruler; verticals snap to the third point. That is correct for a tilted camera. For a level view, use a 2-point ruler.
Everything looks like a fisheye. The vanishing points are too close together. Move them out, beyond the canvas edge for a normal lens; the vanishing point distance calculator gives the exact spacing.
Where to go next
Photoshop's perspective tools · Procreate's drawing guide · Illustrator's perspective grid · 1-point vs 2-point vs 3-point · drawing tablets for perspective work
Questions
How do I make a perspective ruler in Clip Studio?
Layer → Ruler/Frame → Create Perspective Ruler, choose 1-point, 2-point or 3-point, tick Create new layer, and click OK. Or use the Perspective Ruler sub tool and draw along two parallel edges of a reference; Clip Studio places the vanishing point where they meet.
Why are my lines not snapping to the ruler?
Check that Snap to Special Ruler is on (the icon in the command bar, Ctrl/Cmd + 2 by default), that the ruler is on the layer you are drawing on or is set to show on all layers, and that the ruler's snapping has not been turned off with the small handle on the eye level. Vector layers and raster layers both snap.
How do I move the vanishing point in Clip Studio?
Switch to the Object tool (O), click the ruler, and drag the diamond handle on the vanishing point along the eye level. Drag the eye-level line itself to raise or lower the horizon. Hold Shift to keep the eye level horizontal.
What is the difference between a perspective ruler and a perspective grid in Clip Studio?
The perspective ruler is the snapping tool: it has vanishing points and an eye level, and strokes follow it. Clip Studio does not draw a measured grid (equal ground squares) for you; the ruler's optional grid shows guide lines only. For a measured, lens-accurate grid, import one as an image layer and set the ruler's points on it.
Can Clip Studio do fisheye perspective?
Yes. Create Perspective Ruler has a fisheye option in Clip Studio Paint 2.0 and later, curving the guides up to 180°. For wider views and 6-point, use the curvilinear grid here and import it as a layer.
Does the perspective ruler work in Clip Studio Paint on iPad and phones?
Yes, with the same menu (Layer → Ruler/Frame → Create Perspective Ruler) and the same Object tool handles. Snap to Special Ruler is in the command bar; on a phone it is under the Edit menu.
How do I make a perspective grid in Clip Studio Paint?
Layer > Ruler/Frame > Create Perspective Ruler, choose 1-, 2- or 3-point, and tick Create grid in the same dialog to get a drawn grid rather than only the guide lines. The grid belongs to the ruler, so moving a vanishing point redraws it. For a grid that matches a real focal length, export one from this site and import it as a layer instead.
A new lesson and a new grid, about once a month.
Each lesson arrives by email before it goes on the site, with the grid it was drawn on and the link to open it. Subscribers also get both free starter packs and the subscriber price on the paid ones. Never more than two emails a month; one click to leave.
Handled by Kit on our behalf. Your address is used for this letter and nothing else — see the privacy page.