 by
by Figures are where perspective drawings most often go wrong, because a building that is a little off still looks like a building, while a person a little too big looks like a giant. One rule does most of the work here, and it is almost embarrassingly simple: on level ground, the horizon crosses every standing figure at the same point on the body. Learn that and you can place a crowd without measuring anything. The construction further down is for the cases it does not cover. It uses the grids and the figure height calculator on this site, but every step also works on paper with a ruler.
Figures in perspective means people drawn so their size and position agree with the scene's horizon and vanishing points. The governing fact: the horizon is at the viewer's eye height, so any figure standing on the same ground as the viewer, at the same height, has their eyes on the horizon wherever they stand. Everything else in this lesson follows from that.
The one rule: the horizon runs through the eyes
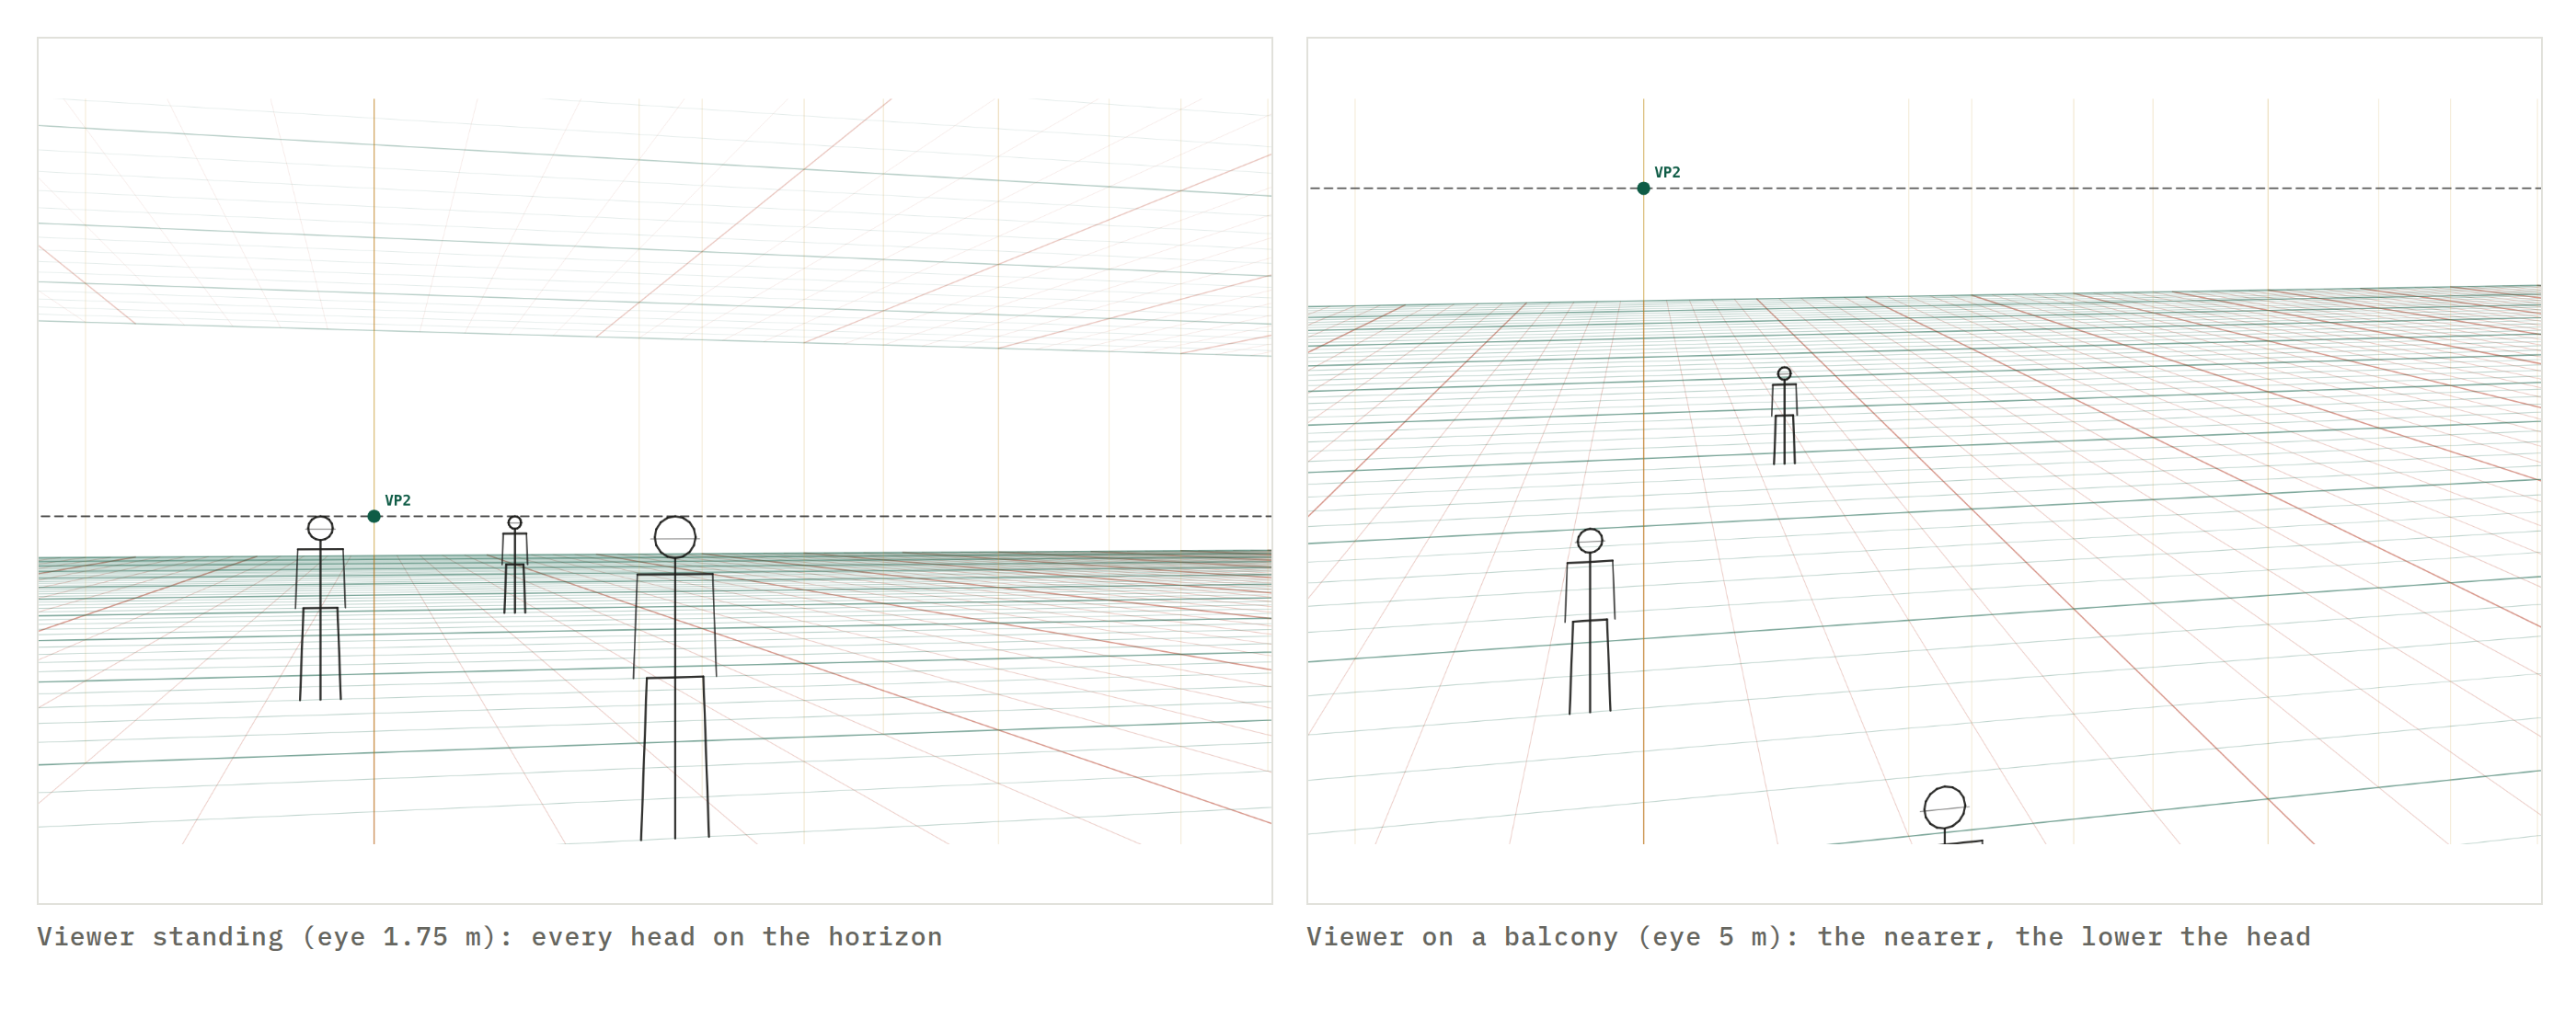
Stand on level ground with people around you. The horizon line is at your eye height. Anyone who is your height has their eyes at your eye height too, so in the picture their eyes fall exactly on the horizon: the person next to you, the person a hundred metres off, all of them. Distance changes only one thing: how far their feet are below the horizon. Near feet are low in the picture; far feet climb toward the horizon.
That gives you a drawing method with no measuring. Mark the horizon. For every standing figure, place the head just above it (eyes on the line), and drop the feet as far as the figure's distance demands: a long way for someone near, a hair for someone distant. Then draw the body between. It also gives you a check for any picture: if the heads of a standing crowd form a level line, the viewer is standing; if the heads climb as they recede, the viewer is lower than they are (kneeling, seated, a child); if the heads drop as they recede, the viewer is higher (a step, a balcony, a horse).
The rule is exact only for people the viewer's height on the viewer's ground. Taller people have eyes a little above the line, shorter a little below, and the amount shrinks with distance. But as a first pass it is right far more often than any other habit, and it is the reason a drawing done with it "just looks right".
Sizing a figure at any distance: the transfer method
The horizon rule tells you where the head goes, but not how tall a figure is at a given depth. For that you need one reference figure and a vanishing point.
Draw one figure at a place where you are sure of its size: someone standing beside a door, say, in a scene where you have already built the door in perspective. Now from a vanishing point on the horizon, draw two lines: one through the top of that figure's head, one through their feet. Between those two lines, at any depth along them, a figure of the same height fits exactly; the lines are the top and bottom of an invisible wall of people all the same height, receding to the vanishing point.
To put a figure somewhere else on the ground, not on that receding line, slide it in two moves. First slide it along the receding lines to the depth you want. Then draw a horizontal line from its head and another from its feet, and slide sideways along them to the position you want. Horizontal moves keep the size; only depth changes it. On a two-point grid, use either vanishing point for the first move; both work.
On the grids here this is easier still, because the ground is marked in metre squares. Count squares to find the depth you want and read the figure's height from the metre cube at the same row. The perspective box generator places 1.75 m figures at any position you type, so you can build a crowd, read off the heights, and draw your own figures over the placeholders.
Reading the number instead
When the scene is set up like a camera (a lens in millimetres and a known distance), a figure's height in the picture is just arithmetic, and it is worth knowing the shape of the numbers. With a 50 mm lens on a full-frame camera (a 3:2 frame), a 1.75 m person at 5 m is about 73% of the picture height, at 10 m about 36%, at 20 m about 18%, at 40 m about 9%: double the distance, halve the size. A 24 mm lens makes everyone half as tall in the picture as a 50 mm at the same distance; an 85 mm makes them 1.7 times taller. The figure height calculator gives the exact figure for any lens, height and distance, and the vanishing point finder reads the lens off a photo so that a drawn figure will match a photographed background.
Seated figures, children, and different heights
Everything above assumes people the viewer's height. Real crowds are not. The method for anyone else is the same in every case: find the standing height at that spot first, then take a fraction of it.
Seated. A seated adult's head is at about three-quarters of their standing height (a little more on a high stool, less on a low sofa). Draw or imagine the standing figure at that depth, then bring the head down to three-quarters and keep the feet where they were. Their eyes are now below the horizon by a quarter of the distance from the ground line to the horizon at that depth; that quarter is tiny for a far figure and large for a near one, which is exactly what the eye sees.
Children. A six-year-old is about two-thirds of adult height, a toddler about half. Same construction: standing adult height first, then the fraction. Children's heads are proportionally larger, which is a drawing matter rather than a perspective one; the perspective part is only the total height.
Tall and short adults. A 1.9 m figure's eyes sit above the horizon; a 1.5 m figure's below. The offset is a fixed fraction of the figure's own height, so it shrinks with distance along with everything else. In a crowd this is what stops the heads forming a rigid line and makes it look like people rather than pickets.
Figures on steps, slopes and platforms
The viewer's eye height sets the horizon; nobody else's does. A figure standing on a step is a figure whose ground level is higher. Build the step in perspective, find the standing figure's height at that depth as if they were on the floor, and then lift the whole figure by the step's height measured in the same vertical scale (the metre cube, or a reference figure's height, at that depth). Their eyes are now above the horizon by the step height. Ten people on a staircase are ten such lifts, and the rule from the first section becomes a diagnostic: heads that climb as the figures recede mean the ground is rising, which is what a staircase should look like.
Slopes work the same way with a continuously changing lift. For a street that runs uphill away from the viewer, the road's own vanishing point is above the horizon and figures' feet follow the road while their heights still come from the horizon-based construction at each depth.
Drawing the figure itself in perspective
The size is the perspective problem; the figure is a drawing problem, but three habits keep the two agreeing.
Draw the figure inside a box. A person is roughly a box 0.5 m wide, 0.3 m deep and 1.75 m tall; place that box on the grid with its edges going to the vanishing points, and the figure's shoulders, hips and feet inherit the correct perspective from the box. This is how a figure turning toward one vanishing point looks turned rather than pasted on; the perspective box generator draws the box and a simple figure inside it.
Keep the horizon in mind when foreshortening. A figure seen from above (high horizon) shows the tops of shoulders and head; one seen from below shows the underside of the jaw and the soles of raised feet. The head lesson, how to draw the head in perspective, applies the same box logic to the skull.
Let far figures simplify. At 20 m a person is a silhouette with a light side and a dark side; drawing fingers on them makes the picture look flat because the level of detail no longer shrinks with the size. Detail is part of perspective too.
Where figures go wrong
The giant in the foreground. A near figure drawn with the head far above the horizon, in a scene where the viewer is standing. Either the figure is on a platform or the head belongs on the horizon; pick one.
A crowd with heads on a slope for no reason. Heads climbing as they recede means the viewer is lower than the crowd; if the viewer is supposed to be standing in it, level the heads.
Sizing by feel. Two figures at the same depth drawn at different sizes because one "felt" bigger. Transfer along the vanishing lines; feel is what the method replaces.
Figures that ignore the ground. Feet floating above or sinking below the ground plane at their depth. Put the feet on a grid line first and build the figure up from there.
One lens for the figures, another for the building. A background built on a wide grid with figures sized from a long-lens calculation, or vice versa. Use one grid for everything in the picture; the figure calculator and the grid tools share the same camera model so the numbers agree.
Exercises
Set up the 2-point grid at 50 mm, viewer standing, and draw six standing figures at 3, 5, 8, 12, 20 and 30 m with the horizon through their eyes. Then raise the horizon to a first-floor balcony and draw the same six. Print the grid with scale figures if you would rather work on paper. When the standing case is automatic, add one seated figure and one child at each depth.
What to draw next
Figure height calculator · horizon and eye level calculator · how to draw the head in perspective · how to draw a room in perspective · how to draw perspective
Questions
How do you draw people in perspective?
Put the horizon at the viewer's eye height. Every standing person the same height as the viewer has their eyes on the horizon, wherever they are in the scene; draw the head at the horizon and the feet as far below it as the distance demands. Size everyone else from one figure you have already drawn, by sliding it along a line to the vanishing point.
Why do the eyes of every figure line up with the horizon?
Because the horizon is at the viewer's eye height. Anyone whose eyes are at the same height as the viewer's has their eyes on the horizon no matter how far away they stand; distance only changes how far their feet are below it. It is the quickest check that a crowd is drawn consistently.
How do I scale a figure at a different distance?
Draw one figure at a known spot. From the vanishing point, draw lines through its head and feet; between those lines, at any depth, a figure of the same height fits exactly. To move it sideways, draw a horizontal line from the head and another from the feet at the new depth and slide along them.
How big should a person be at 10 metres?
With a 50 mm lens on a full-frame (3:2) camera, a 1.75 m person at 10 m is about 36% of the picture height; at 5 m about 73%, at 20 m about 18%. Double the distance, halve the size. The figure height calculator here gives the number for any lens, frame, distance and height.
How do I draw a seated figure or a child in perspective?
Draw the standing height first, then take the fraction. A seated adult is about 0.75 of standing height at the head, a child of six about 0.65. Their eyes drop below the horizon by the same fraction of the head-to-horizon distance, and the feet stay on the ground line.
What about figures above or below the viewer, like on stairs?
Treat the step as a new ground level. Raise the figure's feet by the step height measured in perspective at that depth (use the vertical scale from a reference figure), and keep the horizon where it was. Only the viewer's height sets the horizon; the people do not.
A new lesson and a new grid, about once a month.
Each lesson arrives by email before it goes on the site, with the grid it was drawn on and the link to open it. Subscribers also get both free starter packs and the subscriber price on the paid ones. Never more than two emails a month; one click to leave.
Handled by Kit on our behalf. Your address is used for this letter and nothing else — see the privacy page.