 by
by Stairs frighten people because they seem to need a new kind of perspective, and they do not. A staircase is a ramp with steps cut into it, and the ramp is a box with one edge tilted. Draw the box, find the one new vanishing point the tilt creates, and the steps fall out of it. Stairs in perspective need exactly one thing you have not already used on a box: a vanishing point for the slope, which sits directly above or below the one the flight runs toward. That is the whole new idea. Everything else is dividing a box you already know how to draw.
Stairs in perspective are a series of boxes of increasing height whose front top edges, the nosings, lie on a straight slope. In perspective the treads recede to the vanishing point of the stairs' direction on the horizon, the risers stay vertical (level camera) and the nosing line recedes to a second point directly above or below that vanishing point, at a height set by the flight's slope. Everything about the flight is decided by three numbers: rise, tread and width.
The numbers
A comfortable stair rises about 17 cm per step and runs 28 cm per tread, which is a slope of about 31°. Fourteen steps climb a 2.4 m storey and cover 4 m of floor. Domestic stairs are 0.9–1.0 m wide, public ones 1.5 m or more; a landing is a full step's width and about 1 m deep. Keep those in mind and the staircase will look climbable, which is the test: stairs drawn with treads too deep look like bleachers and with risers too tall look like a cliff.
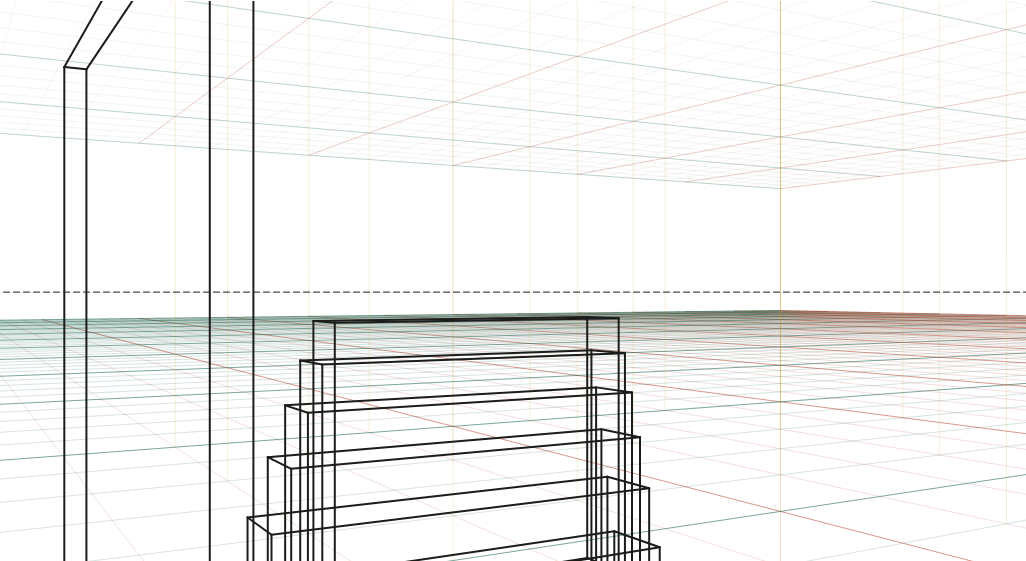
Step 1 — the ramp
Open the box generator with a single box the size of the whole flight: 1.6 m wide, 2.4 m long (eight treads of 0.3 m) and 1.36 m tall (eight risers of 0.17 m). This is the volume the stairs occupy. Its base sits on the floor and recedes to the vanishing point of the stairs' direction; its near vertical edge is the total rise, at true scale.
Now draw the slope: a line from the bottom near corner of the box to the top far corner, on the near side of the stair, and the same on the far side. Those two lines are parallel in the world, so they meet at a point, and that point is directly above the box's vanishing point on the horizon, as high above it as the slope demands. That is the only new thing stairs add to perspective: one slope vanishing point, on the vertical line through the ordinary one.
Step 2 — dividing the flight
Divide the near vertical edge of the box into eight equal risers: it is at true scale, so equal marks are equal steps. Run each mark to the vanishing point on the horizon along the side of the box; these are the lines every tread will sit on.
Divide the base into eight treads. On a grid, the 0.3 m treads are read straight off the metre squares; without one, draw the first tread and use the diagonal method from the buildings lesson to repeat it down the flight. Draw a vertical up from each tread mark to the slope line: where the verticals meet the slope are the nosings, the front top corners of each step.
Step 3 — cutting the steps
From each nosing, draw the tread back horizontally to the vanishing point until it meets the next vertical; from the back of that tread, drop the riser vertically to the next tread line. Work down the flight and the sawtooth appears between the slope line and the floor. On the far side of the stair do the same, or simply run each nosing across to the far slope line toward the other vanishing point: the nosings are horizontal edges across the stair, so they recede to the stair's cross vanishing point like any other width line.
The treads are horizontal planes below eye level, so their tops are visible and get thinner as they climb toward the horizon; a step whose tread reaches eye level would show as a line, and one above it would show its underside. The risers are vertical planes facing you, so they foreshorten sideways only. Looking up a flight you see mostly risers; looking down one, mostly treads. That difference alone tells a viewer which way the stairs go.
Step 4 — the stringer, handrail and wall
The side of a flight is usually closed by a stringer, a sloped board whose top edge runs parallel to the nosing slope, a few centimetres above it, and whose bottom edge is either parallel again or sits on the floor. Both edges go to the slope vanishing point. The handrail is a third parallel line, about 0.9 m above the nosings, so it too goes to the slope point, and its posts are verticals of equal height standing on every second or third nosing. One slope point serves all of them, which is why a well-drawn staircase looks so orderly: five or six lines, one point.
A staircase against a wall is easier still: the wall gives you the plane, and the steps are cut out of it in profile, the sawtooth drawn once on the wall and then given depth toward the cross vanishing point.
Step 5 — landings and turns
A landing is a box the width of the stair and about 1 m deep at the height of the last step; draw it as a box on the top tread line. The next flight starts from its far edge. If it continues straight, the slope point is the same. If it turns 90°, the new flight's treads go to the other vanishing point on the horizon and its slope point is above that one instead; if it turns 180°, the new flight climbs back toward you with its slope point below the horizon on the near side, because from where you stand its slope now descends. Draw each flight as its own ramp, and the landing joins them.
Going down from where you stand is the same construction with the slope point below the horizon: the flight's box hangs beneath the floor you are on, and you see the tops of the treads fully and the risers not at all.
What usually goes wrong
Treads that go to the slope point. Treads are horizontal; they go to the point on the horizon. Only nosings, stringers and handrails use the slope point.
Risers that lean. With a level camera every riser is vertical. Leaning risers mean the camera was tilted, in which case everything vertical should lean with them.
Steps of drifting size. Divide the near edge and the base first and let the divisions meet at the slope; never draw steps one at a time by eye.
A flight too shallow. If the slope looks like a wheelchair ramp, the risers are too small for the treads; 17 cm to 28 cm is the shape of a stair.
Handrail at eye level. A rail is 0.9 m above the treads; on a flight climbing away from a standing viewer it stays below the horizon until the flight is above you.
Draw this
Draw the eight-step flight from the reference three times: from the side, from the bottom looking up, and from the top looking down. Then add a landing and a 90° turn. Then draw the same stairs going down. By the third flight the slope point will be the first thing you look for, and stairs will have become boxes.
What to draw next
How to draw a room in perspective · buildings and streets · perspective box generator · staircase reference · perspective basics
Questions
How do you draw stairs in perspective?
As a ramp first: a sloped box whose base is the length of the flight and whose height is the total rise. Divide the base into treads with lines to the vanishing point and the height into risers by measuring the near edge, then step the slope: each tread is a horizontal plane, each riser a vertical one, and the corners of all the steps lie on the slope you started with.
What size are stairs?
A comfortable step rises 15–18 cm and is 25–30 cm deep; building rules in most countries allow a rise up to about 19 cm and a tread down to about 25 cm. A flight of 14 steps at 17 cm climbs one 2.4 m storey and runs about 4 m. Stairs are about 0.9–1.2 m wide in a house, 1.5 m or more in public buildings.
Where is the vanishing point for stairs?
Directly above (for stairs going up away from you) or below (going down) the vanishing point of the stairs' direction on the horizon. The nosings, the front edges of the treads, lie on a line that recedes at the slope of the flight, and all such lines meet at that raised point. Treads themselves still go to the point on the horizon; only the slope has the new point.
How do I draw stairs going down?
The same construction with the slope point below the horizon instead of above it. You see the treads' tops more clearly and the risers hardly at all when looking down a flight; when looking up a flight the risers face you and the treads are thin. A staircase seen from its side is a sawtooth between two parallel slope lines.
Do I need a special grid for stairs?
No. Any two-point grid works: the slope point is found by measuring the total rise on the near vertical edge and running that height to the far end of the flight. The box generator lets you stack boxes as steps at real sizes, which is the quickest way to see a flight before drawing it.
How do I draw a landing or a turn in the stairs?
A landing is a box the width of the stair and about 1 m deep; the next flight starts from its far edge, usually turning 90° or 180°, so its treads go to the other vanishing point (or back toward the first) and its slope point sits above that. Draw each flight as its own ramp, meeting at the landing box.
A new lesson and a new grid, about once a month.
Each lesson arrives by email before it goes on the site, with the grid it was drawn on and the link to open it. Subscribers also get both free starter packs and the subscriber price on the paid ones. Never more than two emails a month; one click to leave.
Handled by Kit on our behalf. Your address is used for this letter and nothing else — see the privacy page.