 by
by A car is a box on four cylinders, and every good car drawing starts by admitting it. How to draw a car in perspective is a discipline problem more than a drawing problem. The drawings that fail are almost always the ones that began with a headlight or a wheel arch, because by the time the body is half-finished the box it should have fitted into no longer exists. Build the box first, at the car's real size, and the hard parts get easy in the order they arrive. Along the way it covers the two choices that make a car drawing look like a photograph or a cartoon, the lens and the camera height.
Drawing a car in perspective means constructing the vehicle inside a box of its real dimensions on a perspective grid, so that its length, width and height converge correctly and its wheels sit on the ground at the right depth, then shaping the body within the box. The wheels are circles on horizontal axles, which makes them ellipses with their minor axes on the axle line running to the vanishing point.
Step 1 — the box, at the car's real size
Open the perspective box generator and place one box: 4.5 m long, 1.8 m wide, 1.5 m tall, rotated 25° so you see its front and one side. That is a saloon or a hatchback; an SUV is the same footprint about 1.7 m tall, a pickup 5.5 m long. Set the camera height to 1.3 m (a crouching photographer, the classic car-brochure height) and the lens to 50 mm. Drag to turn the scene until the box shows the view you want: three-quarter front is the usual choice, with the front face about twice as wide in the picture as the side is deep.
Draw the box with all twelve edges, including the ones you cannot see. Its front and back faces go to one vanishing point, its sides to the other, its verticals stay vertical. Everything that follows is measured against this box, so it is worth taking care over the convergence.
Step 2 — axles and contact points
Divide the box's bottom edge on the near side. The front axle sits about 0.9 m back from the front of the car and the rear axle about 2.7 m behind it (the wheelbase), leaving 0.9 m of overhang at the back. Mark those two points on the near bottom edge, then draw the two axle lines across the box from each point to the far vanishing point (the one the front and back faces go to). They are the lines the wheels hang on.
Where each axle line meets the near and far bottom edges of the box are the four contact points, where the tyres touch the ground. Mark them. A car floats or slides in a drawing when the wheels are not planted on these points, and it is the single most common failing.
Step 3 — the wheels
Each wheel is a circle 0.65 m across standing on its contact point, in a vertical plane parallel to the side of the car. In perspective it is an ellipse, and the ellipses in perspective lesson gives the rules: its minor axis lies along the axle line (which runs to the vanishing point, so the ellipses tip rather than standing vertical), and the near wheel is rounder than the far wheel on the same axle, because it is further from that vanishing point.
The quick construction: at each contact point, draw a square 0.65 m on a side standing on the ground, in the side plane of the car (its vertical edges vertical, its top and bottom edges going to the side vanishing point). Cross its diagonals for the wheel centre, and draw the ellipse inside the square with its minor axis on the axle line. The hub sits at the diagonal crossing, which is a little toward the far side of the ellipse, not at its middle.
Give each wheel its width (about 0.2 m) with a second ellipse further along the axle line toward the vanishing point, joined by short tangent lines. The near wheels show their tread edge on the outside; the far wheels show it on the inside, if at all. The wheel arches are larger ellipses concentric with the wheels, cut into the box's side.
Step 4 — carving the body
Now the box becomes a car. Work in the side view first, on the near side face of the box, where the car's profile is easiest to judge: the bonnet line rising from the front bumper, the windscreen sloping back, the roof, the rear screen, the boot. Draw this silhouette on the near face, then project every corner of it across to the far face along lines to the far vanishing point. Where the corners of the silhouette meet the far face, join them: the roof becomes a plane, the windscreen a plane, the bonnet a plane, each converging correctly because it was projected rather than drawn twice.
Then round off. Real cars have almost no straight lines, but every curve is a curve on one of the box's planes, or a bend between two of them. The bonnet's crown is a curve on the top plane; the wing's bulge is a curve pushed out from the side plane; the windscreen's rake is a plane that leans back from the front face. Keep asking which face of the box each surface belongs to and the car stays solid.
The centre line helps enormously: a line along the middle of the top plane, from front to back, to the side vanishing point. The grille, badge, bonnet crease, windscreen centre and rear number plate all sit on it, and mirror-image details (headlights, mirrors) are placed symmetrically across it, remembering that the far one is smaller and closer to the centre line in the picture.
Step 5 — the details that sell it
Headlights and grille on the front face, sitting within the box's front plane and following its convergence. Door lines as verticals (or as the third vanishing point's lines in a tilted view) on the side face. Mirrors as small boxes stuck onto the side face at the base of the windscreen. Ground shadow under the car, darkest under the middle, following the shadows in perspective rules. A figure beside it at 1.75 m, placed with the figures in perspective construction, which is the fastest way to make the car's size read.
Lens and camera height
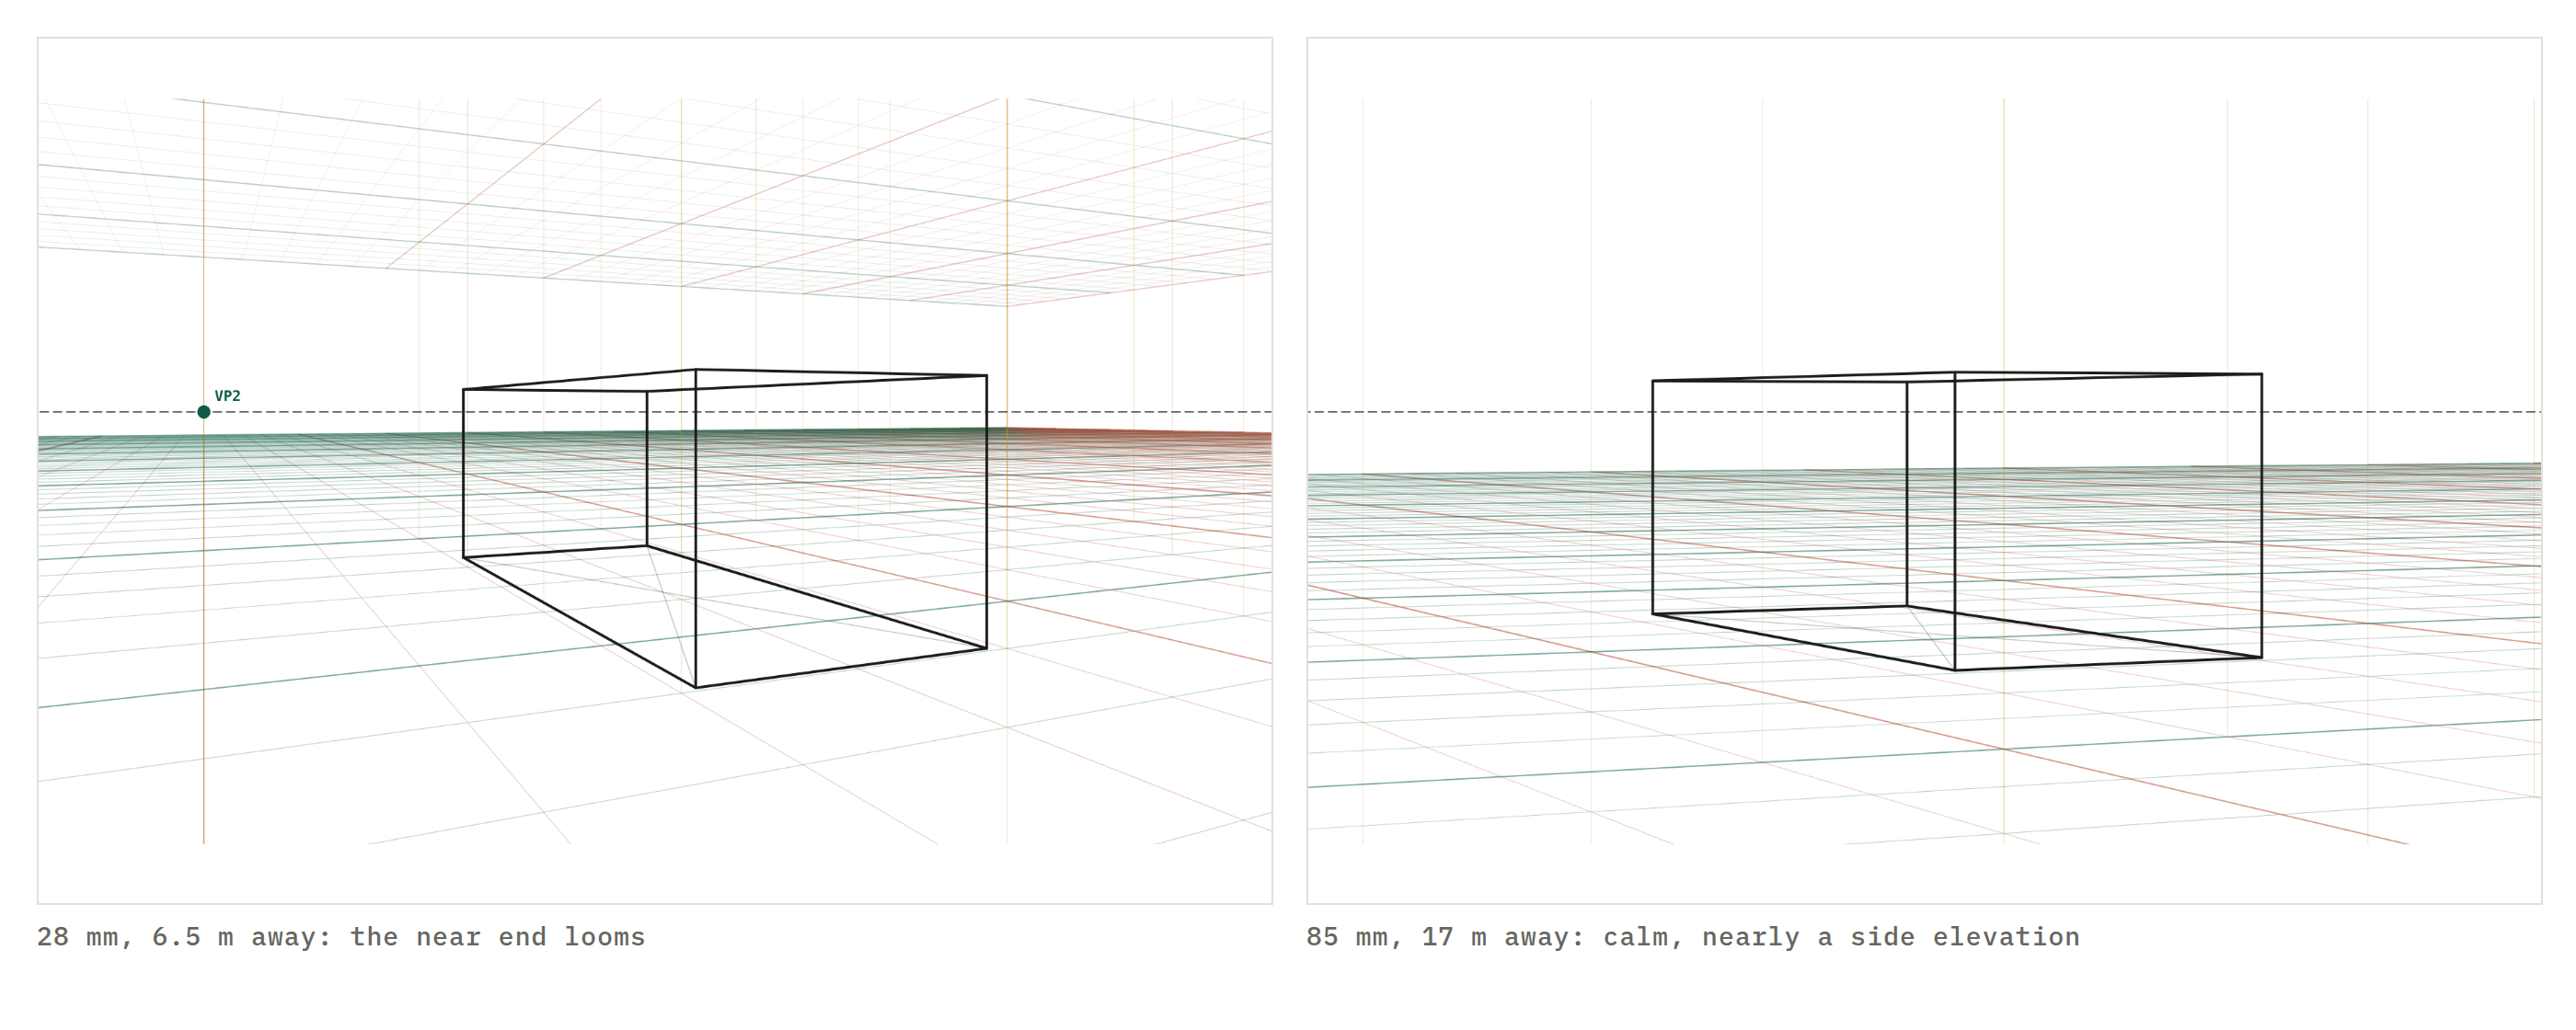
The two choices that change a car drawing more than any detail. Lens: at 24–28 mm the near wheel and bumper loom and the car seems to lunge, which advertising uses on purpose and which looks wrong on a family hatchback; at 50 mm it looks like a photograph; at 85 mm and above it flattens toward a side elevation, calm and technical. Camera height: at 0.5 m the car towers and shows its underside, the hero shot; at 1.3 m it looks like a person crouching, the brochure view; at 1.6 m the roof appears and the car sits in the world; above 2 m it becomes a car park. Set both on the grid before drawing and every line of the box already has the right convergence.
Where car drawings go wrong
Wheels drawn as vertical ovals. Their minor axes belong on the axle line to the vanishing point. Vertical ellipses are correct only for a pure side view.
Both wheels on a side the same size. The far wheel is smaller and a thinner ellipse. Construct each from its own square.
Windscreen drawn as a rectangle. It is a plane leaning back from the front face; its top edge goes to the far vanishing point and it is shorter at the far side.
A car too tall or too short. Measure against the box: a saloon is a third as tall as it is long. The grid's metre squares make the check instant.
The far side ignored. Even unseen, the far edges determine where the roof and bonnet end. Draw the whole box.
Draw this
Place the car box on the box generator, export it, and draw the same car three times over it at 28 mm, 50 mm and 85 mm; then at camera heights 0.5 m, 1.3 m and 2 m. Ten boxes with wheels before any bodywork is the fastest route to cars that sit on the road.
Keep going
Ellipses in perspective · shadows in perspective · figures in perspective · perspective box generator · how to draw perspective
Questions
How do you draw a car in perspective?
Start with a box the car's real size on a perspective grid (about 4.5 m long, 1.8 m wide, 1.5 m tall), run two axle lines through it to the vanishing point, hang four wheels on the axles as ellipses, then carve the body out of the box: bonnet, cabin, boot. The box guarantees the proportions and the wheels are where most drawings fail.
What are the proportions of a car?
A typical hatchback or saloon is 4.3–4.8 m long, 1.75–1.85 m wide and 1.4–1.5 m tall, with a wheelbase of 2.6–2.8 m and wheels about 0.65 m across. In wheels: the car is about seven wheel-diameters long and two-and-a-bit tall, and the wheelbase is about four wheels. SUVs are taller (1.6–1.8 m) and pickups longer (5.3–5.9 m).
How do I draw car wheels in perspective?
As ellipses whose minor axis lies along the axle, which runs to the vanishing point across the car. The near wheel is a fuller ellipse than the far one on the same axle. Give each wheel width with a second ellipse further along the axle, and put the hub at the true centre, slightly toward the far side of the ellipse.
Which lens is best for drawing cars?
For a natural look, 35–50 mm from a standing or crouched viewpoint. Wide lenses (24 mm and below) make the near end huge, which car advertising uses on purpose; long lenses (85 mm and up) flatten the car into a side elevation. Set the lens on the grid before you draw and the convergence is right automatically.
Where should the horizon be when drawing a car?
For a natural three-quarter view, at roughly bonnet or roof height: a camera 1.0–1.6 m above the ground. Lower (0.5 m) makes the car loom and shows the underside of the bumpers; higher (2 m and up) looks down onto the roof and reads as a car park photo.
Why does my car look like it is sliding or floating?
The wheels are not sitting on the ground line at their depth, or the two wheels on one side are not on a line to the vanishing point. Draw the contact points first, where each wheel touches the ground, on the box's bottom edge; the wheels then sit exactly on the ground.
A new lesson and a new grid, about once a month.
Each lesson arrives by email before it goes on the site, with the grid it was drawn on and the link to open it. Subscribers also get both free starter packs and the subscriber price on the paid ones. Never more than two emails a month; one click to leave.
Handled by Kit on our behalf. Your address is used for this letter and nothing else — see the privacy page.