 by
by Three-point perspective is two-point perspective with the camera tilted. That single sentence is most of the theory. When you look up at a tower, the verticals converge toward a point far above; when you look down into a street, they converge toward a point far below. The two horizontal vanishing points stay on the horizon, exactly as in two-point. This lesson defines the term, tells you when it applies, and then builds three drawings step by step on a grid you can drag.
3 point perspective is a drawing system with three vanishing points: two on the horizon, where the horizontal edges of a box converge, and one above or below the picture, where its vertical edges converge. It describes exactly what a camera sees when it is tilted up (the third point is the zenith) or down (the nadir). In one- and two-point perspective the camera is level and verticals stay vertical.
When a scene needs three points
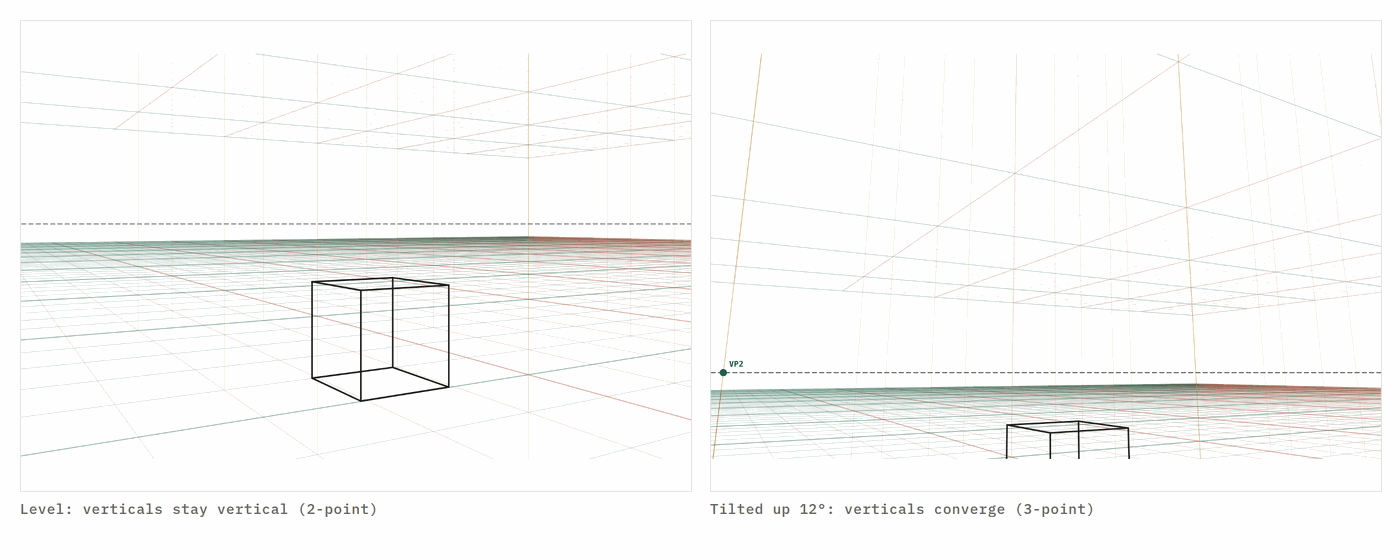
Stand in front of a tall building and look at it straight ahead: the sides are vertical. Now tilt your head back to see the top, and the sides lean inward. Nothing about the building changed; your picture plane tilted. That is the whole test. If the camera (your eye, your phone, the imagined viewpoint of the drawing) is level, use one- or two-point. If it is tilted, verticals converge and you need the third point.
Typical three-point scenes: looking up at towers, cathedrals, trees and streetlights; looking down from a rooftop, a balcony, a drone or a staircase; any comic panel that wants drama; a character seen from above on a bed; a tabletop seen from a standing viewpoint close by. The tilt does not have to be steep. A 10° tilt on a 24 mm lens is enough to make verticals lean visibly, which is why phone photos of buildings so rarely have straight sides.
Step 1: decide where the eye is
Before any line, decide three things: is the camera above or below the subject, how far is it turned, and how wide is the lens. Above means you are looking down and the third vanishing point is below the picture (nadir). Below means you are looking up and it is above (zenith). The rotation decides where the two horizontal points sit; the lens decides how far apart all three points are. A wide lens (24 mm) crowds them together and makes everything dramatic; a long lens (85 mm) spreads them far outside the paper and calms the drawing down. Write the three numbers in the corner of the page: for the tower below, they are "looking up 22°, turned 30°, 24 mm".
Step 2: horizon and the two horizontal points
Draw the horizon. In three-point it is often outside the picture: above the frame when you look down, below it when you look up. Place VP1 and VP2 on the horizon, far apart. On paper, tape extra sheets to the sides or use the string method from the tools for perspective drawing lesson. On the grid, you can simply read where the coloured lines converge. Keep the horizon perfectly horizontal; a tilted camera does not tilt the horizon, it moves it.
Step 3: the third point
Drop a vertical line through the centre of the picture (the centre of vision) and place VP3 on it, well outside the frame. A common mistake is putting it too close, which produces the "fisheye tower" look. As a rule of thumb, VP3 should be at least as far from the horizon as VP1 and VP2 are from each other.
If you want the real figure rather than a rule of thumb: VP3 sits at the focal length divided by the tangent of the tilt from the picture centre, on the side you are tilting toward, and the horizon sits at the focal length times the tangent of the tilt on the other side, both measured in the units the lens is drawn in (for a 35 mm lens the focal length is about 0.97 picture-widths). At 25° that puts VP3 about 2.1 picture-widths above centre and the horizon 0.45 picture-widths below it. The horizon line calculator does this arithmetic for any tilt and lens and opens the matching grid.
Step 4: build the box
Every building starts as a box. Draw the nearest vertical edge first: a line aimed at VP3. From its top and bottom, run lines to VP1 and VP2. Choose the box's width and depth on those lines, then bring the back edges up (or down) toward VP3 again. You now have a box that leans correctly. Everything on the building, windows, doors, cornices, is a subdivision of that box.
Step 5: divide and repeat
To place windows evenly, draw the diagonals of a face to find its centre, then subdivide. Rows of windows on a receding face get closer together as they approach VP1 or VP2, and columns get closer together toward VP3. The one-metre reference cube on the grid is a quick scale check: a storey is about three cubes tall, a door two, a person just under two.
Step 6: check with the lens
Once the drawing is blocked in, compare it with the grid at the same rotation and lens. If your verticals converge faster than the ochre lines on the grid, your VP3 is too close. If your building's corner looks impossibly sharp, your lens is too wide. Adjust and redraw the block-in before adding detail.
Worked example 1: a tower, looking up
Settings: looking up 22°, turned 30°, 24 mm. Open the 3-point grid with those numbers. The horizon sits below the bottom edge; VP3 is above the top. Draw the nearest corner of the tower as a line aimed at VP3, starting near the bottom centre of the page and running almost to the top. Run the base edges to VP1 and VP2. Decide the tower is four cubes wide on each face. Bring the far vertical edges up toward VP3, and you have the shaft. Add floors by subdividing the near edge (equal divisions on the near vertical are not equal on the page: they compress toward VP3), and run each floor line to VP1 and VP2. A cornice at the top is a slightly larger box sitting on the shaft. Ten minutes; stop when the box is convincing.
Worked example 2: a street, looking down
Settings: looking down 28°, turned 30°, 28 mm — the bird's-eye template is pre-set to this. The horizon is above the frame, VP3 below. This time draw the ground plan first: the street is a long rectangle on the ground grid, running to VP1; the buildings are boxes standing on either side. Their tops are closer to VP3 than their bases, so roofs look smaller than footprints. Figures on the pavement are about 1.75 m: use the reference cube, and remember that in a downward view heads are visibly smaller than feet spacing suggests.
Worked example 3: a room from a high corner
Settings: looking down 20°, turned 45°, 35 mm. A room is a box you are inside, so the near edges of the box are the edges of the picture. Draw the far corner of the room first (a line aimed at VP3), then the floor lines to VP1 and VP2, then the ceiling lines. Furniture is small boxes on the floor grid; the bed is a 2 × 1.5 m box, half a cube high. This is the view every comic uses for "we are watching from the ceiling".
Common problems
Everything leans the same way. The horizon is tilted. It must be horizontal even when the camera looks up or down.
The building looks like it is falling over. VP3 is off-centre. It must sit on the vertical through the centre of the picture, unless you deliberately roll the camera.
Nothing looks dramatic. The lens is long and the tilt is small. Try 24 mm and 25° of tilt.
The top of the tower is tiny. The lens is too wide or VP3 too close; the taper is real but exaggerated. Move to 35 mm.
Windows on the far face look wrong. They were spaced evenly on the page instead of converging toward VP2. Subdivide with diagonals, not a ruler.
Practise it
The daily drill serves a three-point prompt about one day in three. Draw the box first, every time, and only then the subject. After a month of ten-minute boxes the third point stops being a mystery.
Next: 1-point vs 2-point vs 3-point perspective, or open the 3-point grid and set up your own shot.
Printable 3-point grids for looking up and looking down use the same camera settings as this lesson.
The 3-point grid also opens pre-tilted as a bird's eye view grid (looking down) and a worm's eye view grid (looking up).
Questions
What is 3 point perspective?
A way of drawing in which lines converge to three vanishing points: two on the horizon for the horizontal directions and a third above or below for the verticals. It is what a camera records when it is tilted up or down, so vertical edges lean instead of staying parallel.
When should I use 3-point instead of 2-point perspective?
Whenever the camera tilts. Looking up at a building, down from a balcony, or at anything where vertical edges visibly lean. If verticals look parallel to you, 2-point is enough.
Where does the third vanishing point go?
Directly above the centre of vision when you look up (the zenith) or directly below it when you look down (the nadir). The steeper the tilt, the closer it sits to the picture; at a 25° tilt with a 35 mm lens it sits about three picture-heights above or below the centre of the picture.
Why do my buildings look distorted?
Usually the three vanishing points are too close together, which is the same as using a very wide lens. Move them further apart, or on the grid tool raise the lens to 35–50 mm.
Is 3-point perspective the same as worm's-eye or bird's-eye view?
Worm's-eye (looking up) and bird's-eye (looking down) are the two common uses of three-point perspective. Both have the third vanishing point on the vertical through the centre of the picture, above for worm's-eye and below for bird's-eye. The grid tool has a page opened in each state: the worm's eye view grid and the bird's eye view grid.
Can 3-point perspective have the horizon inside the picture?
Yes, with a mild tilt. The horizon leaves the frame only when the tilt is greater than about half the vertical field of view. A 10° tilt with a 35 mm lens keeps the horizon inside the picture, near the top or bottom edge.
A new lesson and a new grid, about once a month.
Each lesson arrives by email before it goes on the site, with the grid it was drawn on and the link to open it. Subscribers also get both free starter packs and the subscriber price on the paid ones. Never more than two emails a month; one click to leave.
Handled by Kit on our behalf. Your address is used for this letter and nothing else — see the privacy page.