 by
by Perspective in photography is the way three-dimensional space is flattened onto the picture by the camera's position: how far away things look, how fast they shrink with distance, where the horizon sits and whether verticals lean. It is decided by where the camera is, its height, and how it is tilted; the lens only crops the result. A photograph is a perspective drawing made by a machine, and the machine follows exactly the rules a draughtsman does: one eye, one place, one window. That makes photography the best place to learn what perspective actually depends on, because the camera separates the decisions that people usually tangle together. Start with the thing most photography advice gets backwards: the lens does not change perspective. Only your distance from the subject does. A 24 mm and an 85 mm frame shot from the same spot show exactly the same perspective, one cropped tighter than the other, and the flattery of a portrait lens comes from standing further back, not from the glass.
Perspective in photography is the set of relationships between sizes and positions in a photograph that depend on the camera's position: how quickly objects shrink with distance, where parallel lines converge, how much the near side of a face is larger than the far side. All of it is fixed by where the camera is, its distance from the subject, its height and its direction. The lens decides only how much of that view is recorded.
Distance sets the perspective, the lens crops it
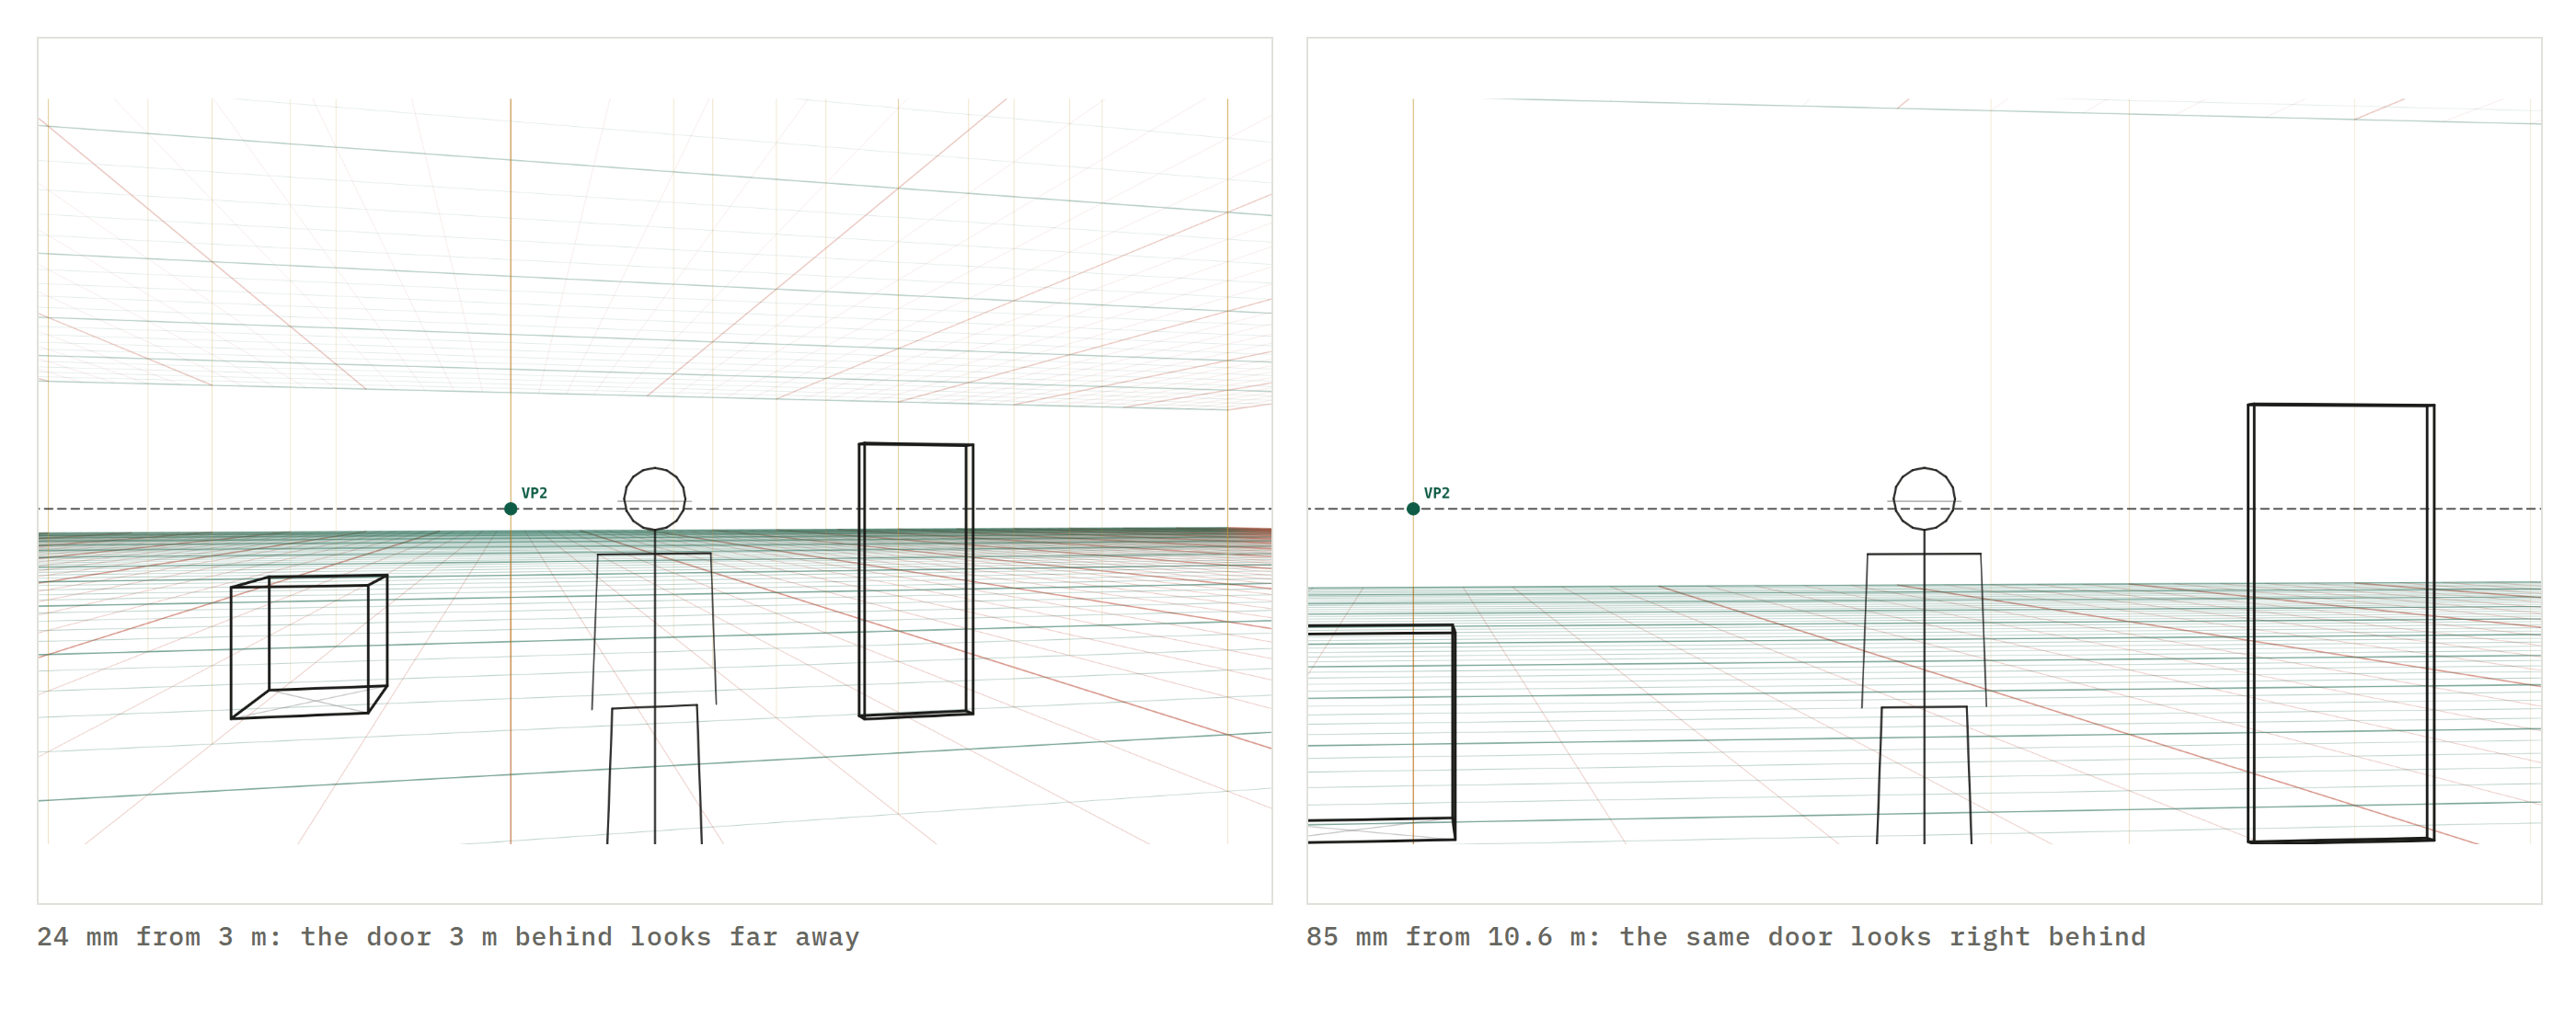
Stand in one spot and photograph a street with a 24 mm lens, then, without moving, with an 85 mm. The second picture is a crop of the middle of the first, enlarged. Every vanishing point, every convergence, every size ratio is identical, because none of them depend on the lens; they depend on the station point, and the station point did not move. This is the single most useful fact in the subject and the one most photographers learn late.
The reason the two lenses seem to give different perspective is that nobody uses them from the same spot. To make a person fill the frame with a 24 mm you stand 1 m away; with an 85 mm you stand 3.5 m away. The pictures now have different perspective, but the distance did it. The lens to field of view calculator gives the angle each lens sees; the perspective inside that angle is the same.
Compression and expansion
Frame a subject at the same size from close with a wide lens and from far with a long lens, and everything behind the subject changes size. From close, the background is many times further from the camera than the subject, so it shrinks and the subject looms in front of it: expansion, the wide-angle look, deep and dramatic. From far, the background is only a little further than the subject in proportion, so it stays nearly the same size: compression, the telephoto look, mountains stacked behind a village, a crowd packed into a wall of faces.
Both are true records of a distance. On the grids, the same effect is the space between the ground squares: with a 24 mm lens the near squares are huge and the far ones tiny; with an 85 mm they are all much the same size. The same scene at 24, 50 and 85 mm in the reference library shows three lenses framed alike; open any in the tool and drag the lens slider without moving the camera to see the crop-only version.
Faces and the wide-angle nose
The most familiar wide-angle "distortion" is a face with a large nose and receding ears, and it is pure distance. At 30 cm, a phone's selfie distance, the tip of the nose is about 10 cm nearer the lens than the ears, a third of the distance, so it is drawn a third larger. At 2 m the same 10 cm is one twentieth, invisible. Portrait lenses are flattering not because of anything in the glass but because 85–135 mm forces you to stand where the face flattens into its familiar proportions. Photograph a face with a 24 mm from 2 m and crop, and it looks like the 85 mm shot, only softer.
For drawing this cuts the other way: the head in perspective is a box, and the box shows its near face larger only when the camera is close. Decide the distance first, then the size of the near planes follows.
Camera height: where the horizon goes
The horizon in a photograph is at the height of the lens, whatever else is in the frame. It is the one straight line through the picture at which all horizontal planes flatten: table tops below it show their surface, shelves above it show their underside. Change the camera height and the whole picture rearranges around the new line while every object stays where it was.
Photographers know the effects by feel. Eye level, 1.5–1.7 m, is neutral and documentary. Waist level, the height of a twin-lens reflex or a phone held low, puts the horizon at the subject's chest and gives figures a quiet stature. Ground level, 0.3 m, makes everything loom and shows the underside of chins and bumpers, the hero angle for cars and skaters. Above 3 m, the balcony and the drone, the horizon leaves the top of the frame, roofs open up and people become ovals. The figures lesson uses this line to size every person in a scene; the reference library has the same objects from a child's height, a chair, standing, a balcony and a rooftop.
Tilt: why verticals converge
Point a level camera at a building and its vertical edges stay vertical, however wide the lens: two-point perspective. Tilt the camera up to get the top in and the verticals converge toward a point in the sky: three-point. In architecture this is called keystoning or converging verticals, and it is the same geometry the 3-point grid draws. It is not a fault, only a viewpoint, but the eye reads leaning buildings as wrong because when we look up we correct for it without noticing.
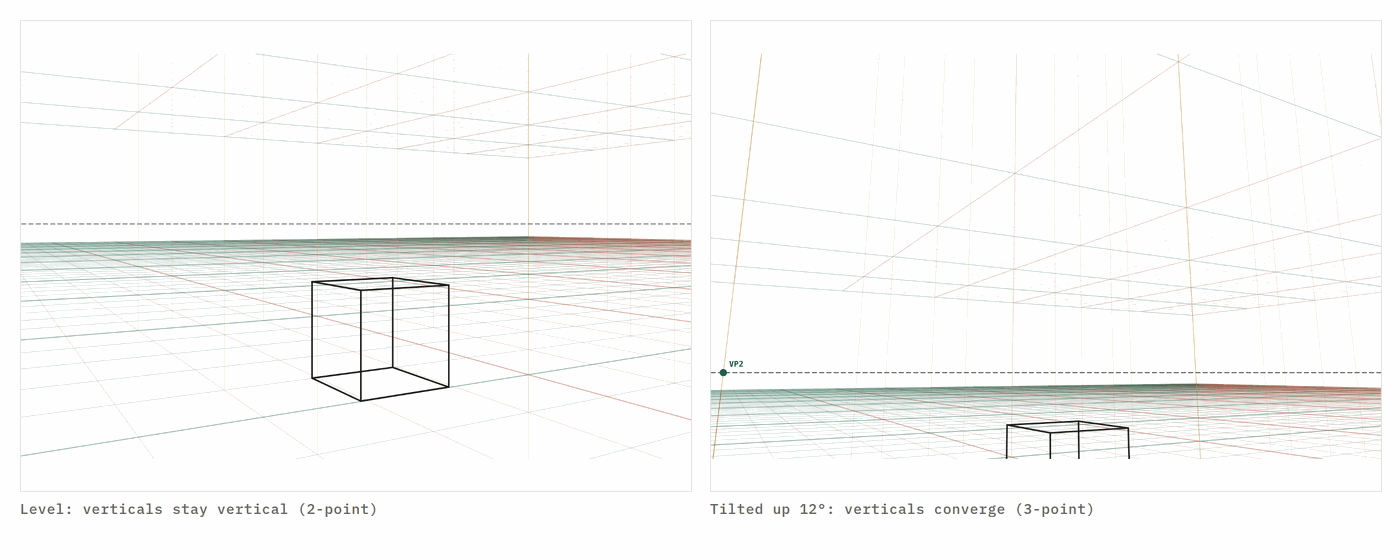
There are three fixes, and all cost something. Keep the camera level and accept that the top of the building is out of frame, or step back and crop the empty foreground. Shift the lens without tilting the camera, which is what tilt-shift lenses and view cameras do: the picture plane stays vertical and the frame slides up it. Or correct afterwards by stretching the top of the picture until the verticals are parallel: the perspective correction tool does it from four corners in the browser, and the Lightroom and Photoshop guides cover the same operation in those apps. Correction always crops and always softens the stretched edge; a mild tilt is worth correcting, a strong one is better reshot.
Angle of view: when straight lines curve
A rectilinear lens keeps straight lines straight, which it can do only by making the edges of a wide view bigger than the middle. Past about 90°, the stretch becomes obvious: people at the sides of a 14 mm group photograph are wider than the ones in the centre. It is the cone of vision from the basics page, exceeded. A fisheye lens gives up on straight lines instead and records the view on a sphere, so nothing stretches and everything bends: the fisheye grid is that projection, and a 180° circular fisheye photograph and a five-point drawing are the same picture. Stitched panoramas are a third answer, a cylinder, which keeps verticals straight and bends the horizontals; the wider the panorama, the more the horizon curves at the top and bottom of the frame.
Forced perspective
The eye judges distance from size only when it has another cue to compare against: overlap, a floor, a shadow, the horizon. Remove those and a person 20 m away who is one tenth the size of a person 2 m away can be posed to sit in the near person's palm. That is forced perspective, and every version of it is the same trick: hide the depth cues and align two objects so their outlines touch. The Leaning Tower, the sun held between two fingers, the film sets where a corridor narrows and its far end is built at half size to look twice as long, all use it. For drawing, forced perspective is a warning: a figure with no floor under it has no size, so give every figure a contact point and a horizon before you decide how big it is.
Reading the perspective of a photograph
Drawing from a photograph means recovering the camera. Find two edges in the picture that are parallel in reality, a window's top and bottom, the two sides of a road, and extend them until they meet: that is a vanishing point. Do it for a second horizontal direction and the horizon is the line through the two points. If the two directions are at right angles to each other, as building edges are, the distance between the points also fixes the focal length, so the whole camera can be read off the picture. The vanishing point finder does this from a photograph in the browser: mark two pairs of edges and it draws the horizon, reports the lens, and opens a grid at the same settings to draw over.
Once the camera is recovered, everything in the lesson applies in reverse: the horizon tells you the camera height, the spacing of the vanishing points tells you the lens, and the size of the ground squares tells you how far away each thing is. A photograph with those three numbers written on it is a reference rather than a mystery.
A short checklist
Decide the distance before the lens. Put the horizon where the picture's point of view belongs, low for grandeur, high for survey, eye level for honesty. Keep the camera level unless the leaning is the point. Stay inside 90° or go fully fisheye. Give every subject a contact with the ground. And when a photograph looks wrong, ask which of those five it broke; it is almost always one of them.
Read next
Perspective basics · vanishing point finder · perspective correction · Lightroom perspective correction · reference library · lens to field of view
Questions
Does focal length change perspective?
No. Perspective is set by where the camera is: its distance from the subject and its height. Focal length only crops. Two photographs from the same spot with a 24 mm and an 85 mm lens have identical perspective; the 85 mm is a crop of the 24 mm. The lens seems to change perspective because we move closer with wide lenses and further back with long ones to keep the subject the same size.
What is lens compression?
The look of a photograph taken from far away with a long lens: objects at different distances appear stacked, almost the same size, with little convergence. It is distance compression, not lens compression; the long lens only lets you fill the frame from that distance. Move close with a wide lens and the same objects spread apart in depth.
Why do wide-angle lenses make faces look strange?
Because you use them from close. At 30 cm the nose is a third closer to the camera than the ears, so it is drawn a third larger; at 2 m the difference is a few percent. The lens is innocent; the distance is the cause. Portrait lenses (85–135 mm) look flattering because they make you stand 1.5–3 m away.
Why do buildings lean in my photos?
You tilted the camera up. A tilted camera turns two-point perspective into three-point: vertical edges converge toward a point above the frame. Keep the camera level and crop, use a tilt-shift lens, or straighten the verticals afterwards with a perspective correction tool; every correction stretches the top of the picture and needs a crop.
How does forced perspective work?
By hiding the depth cue that normally gives away distance. A person 20 m away is one tenth the size of a person 2 m away; if both stand on a floor you cannot see, the eye has no way to know which is far and which is small. Forced perspective photographs remove the floor, the overlap and the shadows, and align the two so they seem to touch.
How do I find the perspective of a photo to draw from it?
Trace two edges that are parallel in the real world until they cross: that crossing is a vanishing point. Two such points from horizontal edges give the horizon through them, and two vanishing points of perpendicular directions give the lens. The vanishing point finder does this from a photo and hands you a matching grid.
A new lesson and a new grid, about once a month.
Each lesson arrives by email before it goes on the site, with the grid it was drawn on and the link to open it. Subscribers also get both free starter packs and the subscriber price on the paid ones. Never more than two emails a month; one click to leave.
Handled by Kit on our behalf. Your address is used for this letter and nothing else — see the privacy page.